Coginito login to product private S3 bucket using CloudFront Signed Cookies
by DonOfDen
Posted on 01 Mar 2021 — 9 min read
Tags: aws cognito cloudfront cf s3 signed cookies userpool lambda lambda@edge chalice
Coginito login to product private S3 bucket using CloudFront Signed Cookies
This article covers an approach on how to protect sensitive parts of your Application by leveraging both frontend and backend Authorization, AWS Cognito, Lambda@Edge and CloudFront.
Solution overview
Let’s suppose we have an S3 static web application which we want to provide access to authorised users.
A potential solution is to add Cognito based login for authenticate and CloudFront to authorize the user to access the website. i.e. Cognito will validate the user and provide a JWT token, with which we will request to a CloudFront Belaviour and Lambda@edge will validate our JWT token and generate signed cookies then redirect with S3 bucket.
Following are the AWS service used to achieve the above solution. Its a long trip! but worth it!
- Cognito
- CloudFront
- S3
- API Gateway
- Lambda@Edge
- Secret Manager
Along with a simple JS script and Python Script for Lambda@Edge which we developed using chalice.
Ok, Lets go step by step.
Sequential Diagram

If you want to view the above diagram clearly, Paste the following text in https://sequencediagram.org/
title Coginito Login + CF Flow

Browser->S3_Public_Bucket:User Request for Application Application  i.e. **www.donofden.com/public/index.html**

note over S3_Public_Bucket: **/public/* **(index.html + login detector in js)

note over S3_Public_Bucket: Some Js will detect that no auth token is present and rediect to cognito

S3_Public_Bucket->Cognito: Redirect to Cognito

Cognito->Browser: Send Cognito login screen to User/Browser

Browser->Cognito: Cognito Browser Validate Login - UserDetials

Cognito->Browser: User logs in and gets JWT from cognito

Browser-->S3_Public_Bucket:
note left of S3_Public_Bucket: In **/public/index.html ** get JWT token and **Request /private/login**

Browser->CloudFront: Request **/private/login **

note over CloudFront,Lambda@Edge: CF Behaviour Lambda@Edge will check JWT is valid and create signed cookes

CloudFront->Lambda@Edge: CF Behaviour

Lambda@Edge->CloudFront: Signed Cloudfront Cookies + 302 Redirect

CloudFront-->S3_Private_Bucket:
note left of S3_Private_Bucket: **Request /private/index.html**

note right of CloudFront: Redirect to **/private/index.html** with signed cookies

# Browser->CloudFront: Signed Cookies
# note left of CloudFront: Cloudfront checks cookies are signed (This has been achived with CF config settings)

CloudFront->S3_Private_Bucket: Private S3 (emis-research-ui)

S3_Private_Bucket->Browser: DonOfDen UI
Cognito
Cognito is a relatively new offering proving Identity Management for Apps and Services, including profile management and multi-factor authentication.
Configuring a User Pool
User pool provides features to control user sign up, sign in and user management with more advanced features. Follow the steps below to create a user pool.
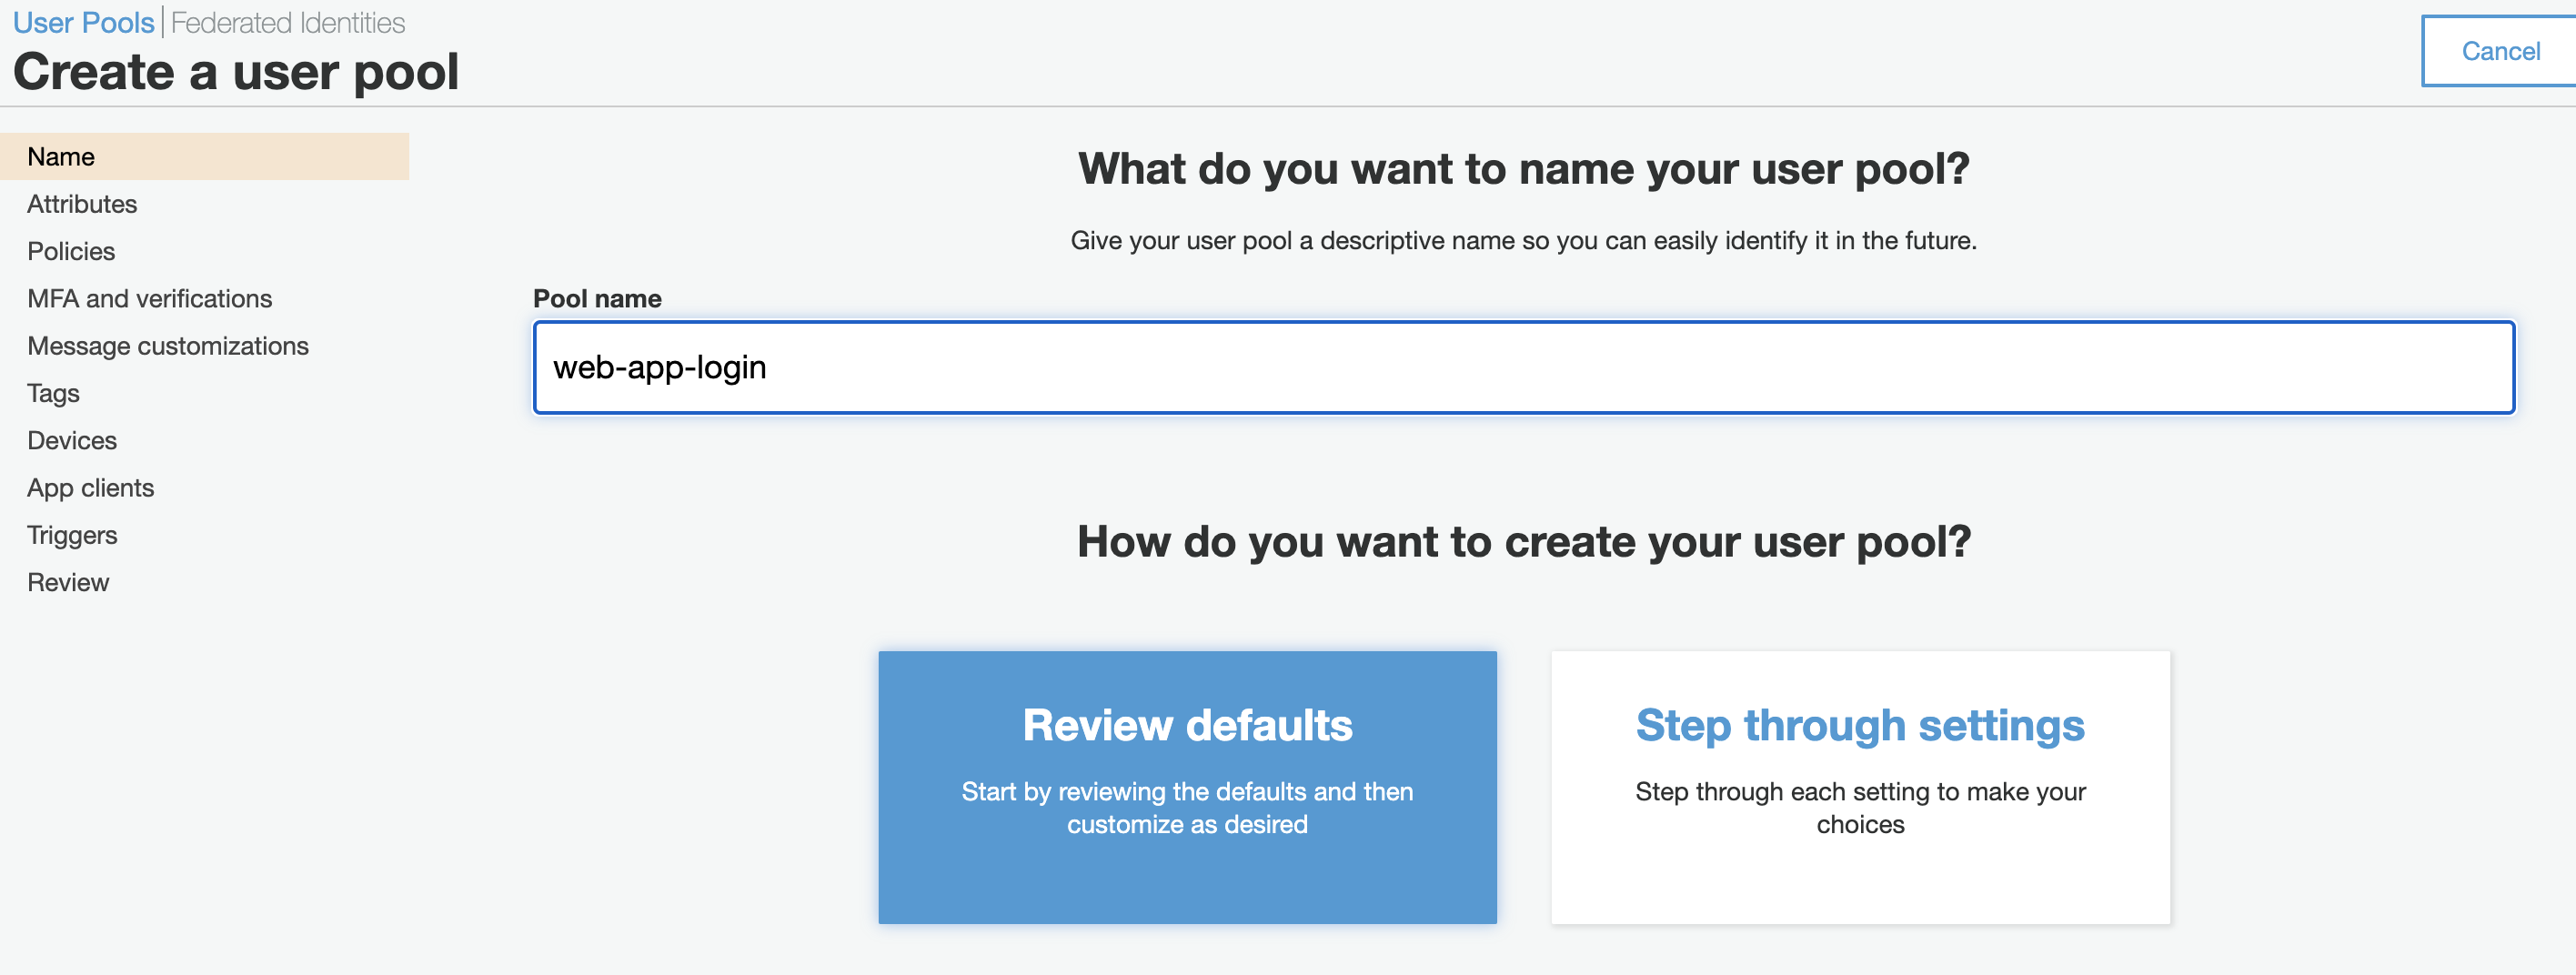
- Go to AWS Cognito service and click “Manage User Pools”.
- Click “Create a user pool” and give a “Pool name” and click “Review defaults” as below.
-
The next page will display the default settings. It is possible to customize features such as user attributes, password policies, verification by email or phone and Multi-factor authentication settings. To keep things simple, Click “Create pool”.
-
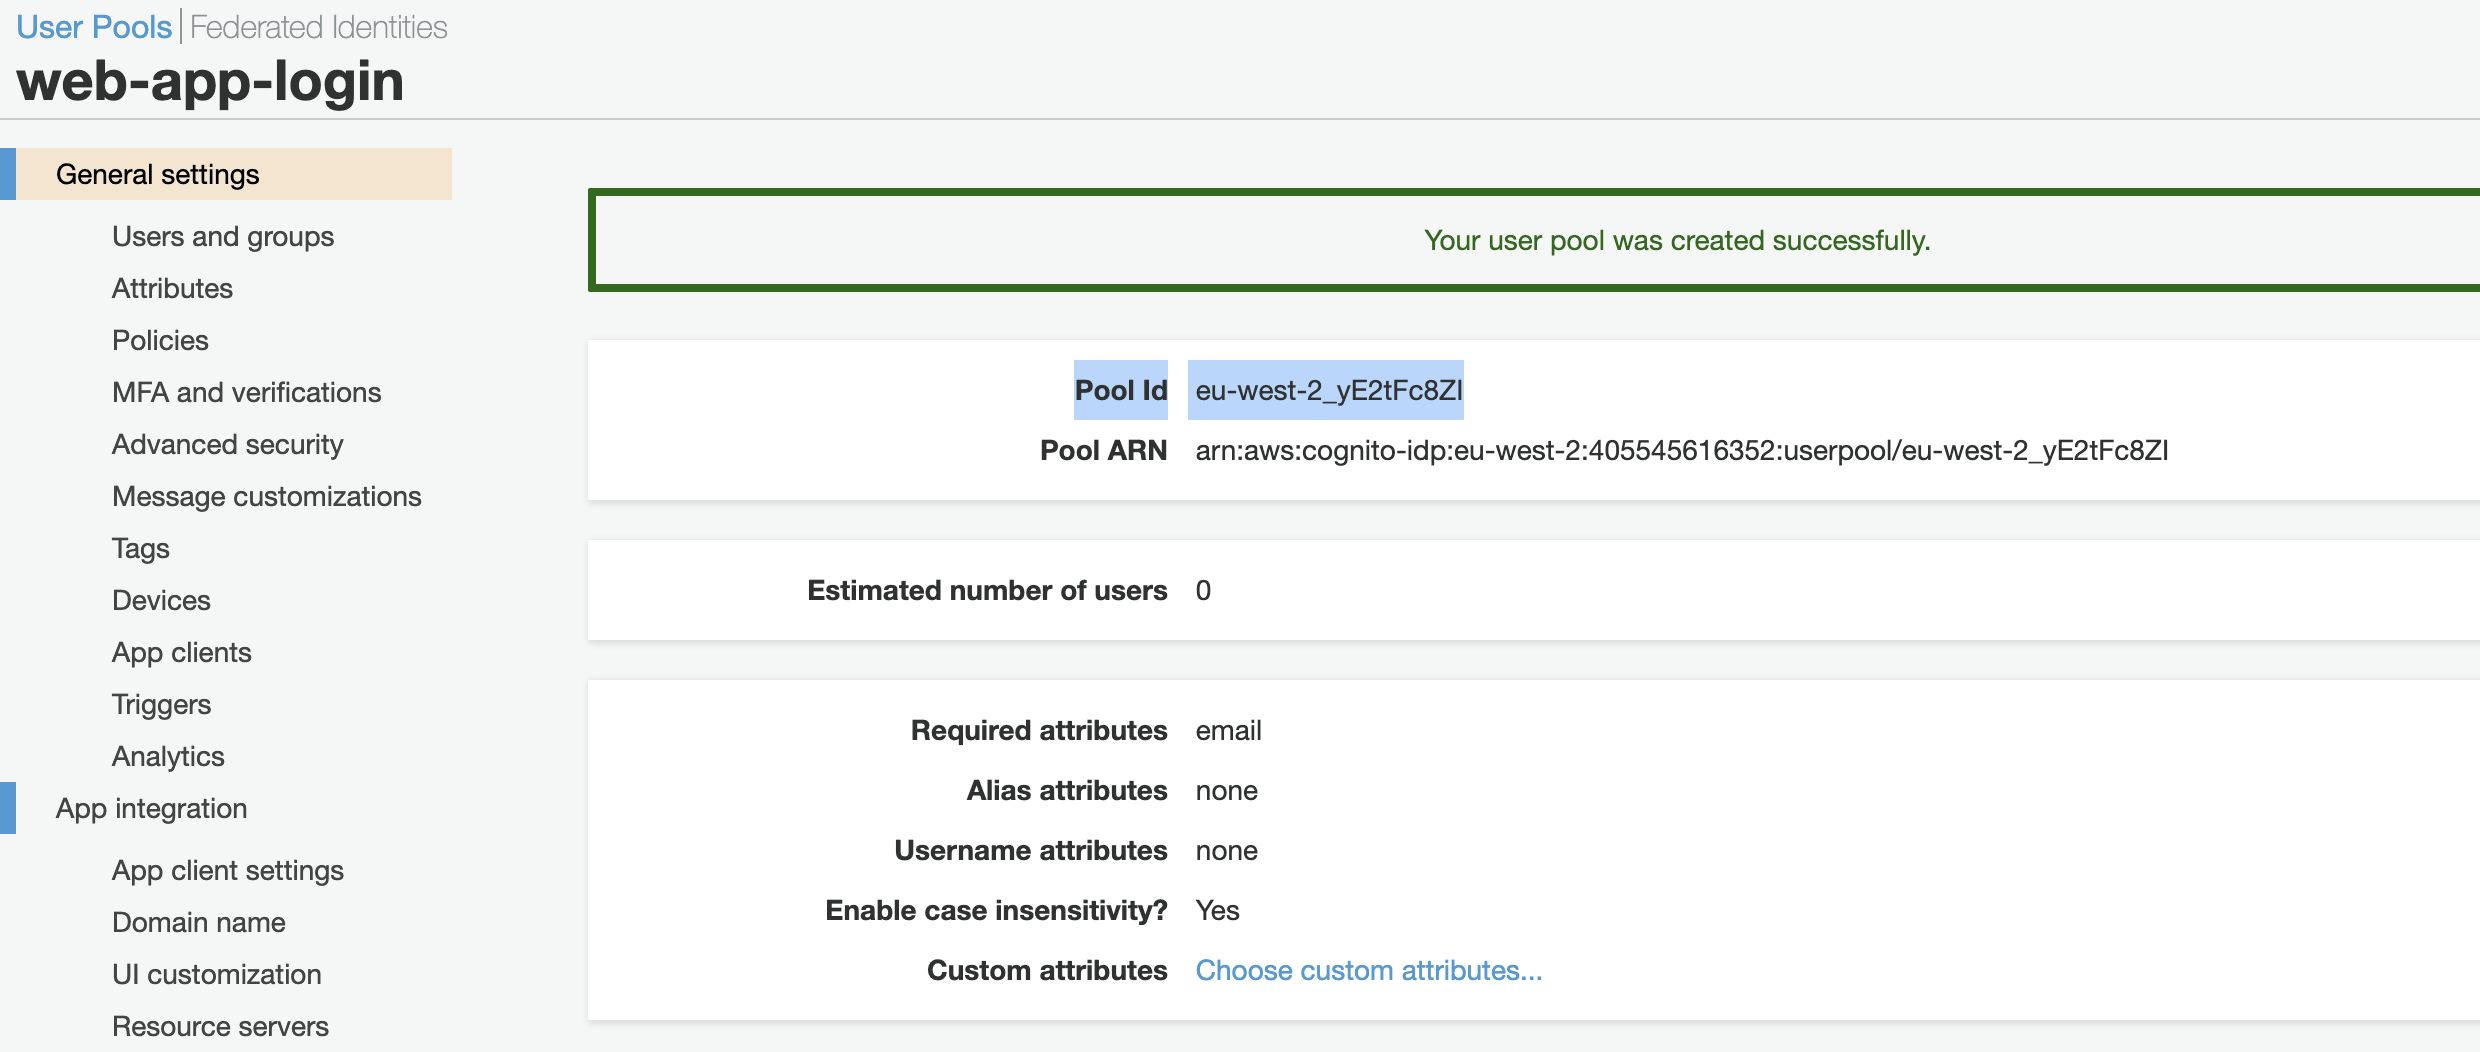
Copy the generated “Pool Id” from “General settings” section as below.
-
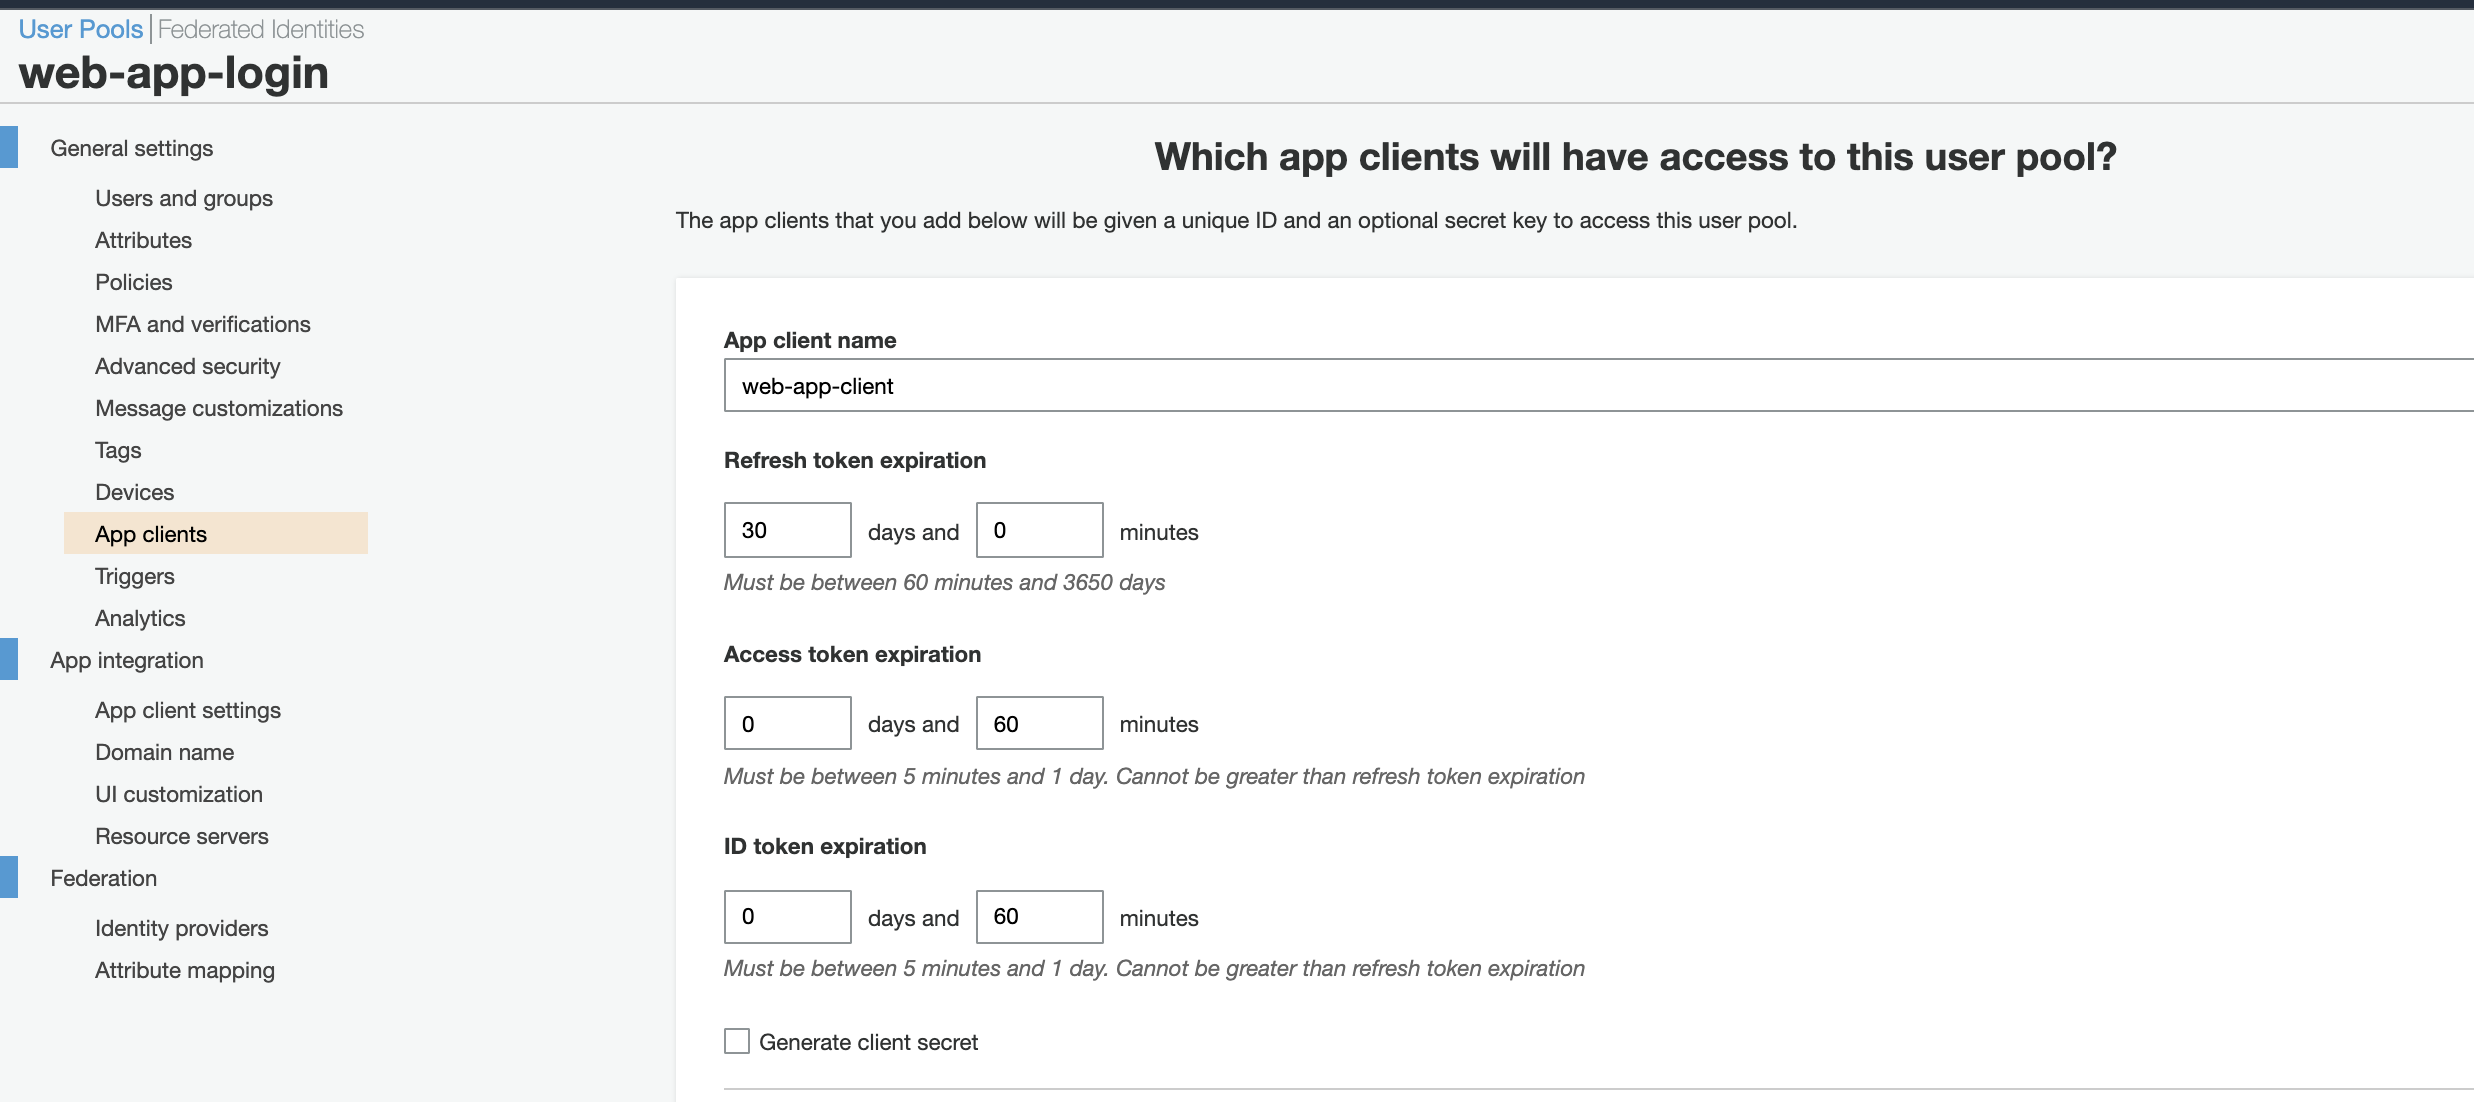
Go to “App Clients” section and click “Add an app client”.
-
Give an “App client name” and uncheck “Generate client secret” as below. The reason for this is because, to quote from AWS document “When creating the App, the generate client secret box must be unchecked because the JavaScript SDK doesn’t support apps that have a client secret.” — AWS Document. Click “Create app client”.
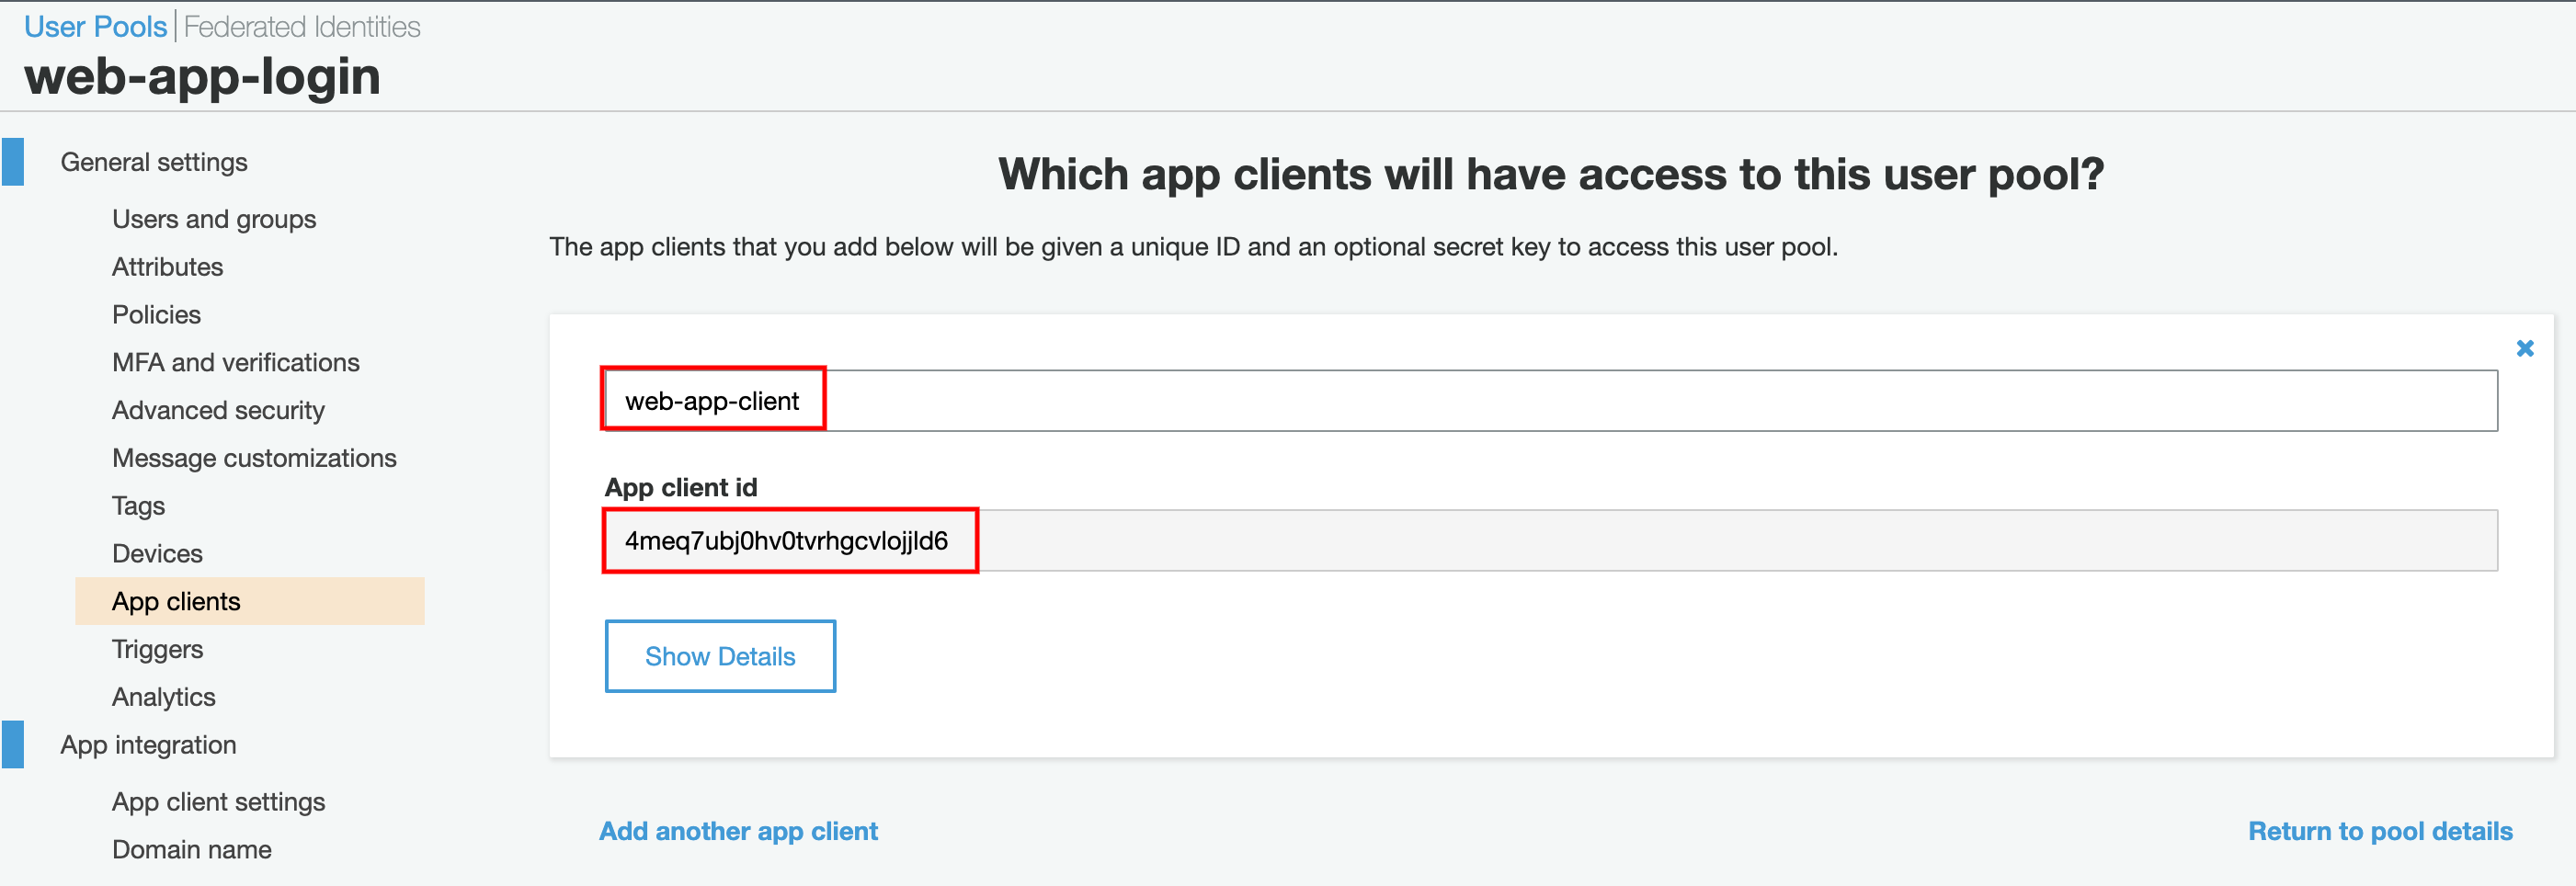
- Copy the generated “App client id” from “App clients” section as below.
Configure an Identity Pool.
Identity pool gives AWS resource access after it verifies the token provided to it, is a valid token generated by a registered authentication provider. In this case the authentication provider that will be registered with the Identity pool will be the AWS Cognito authentication provider that was created in step previous step.
- Go to AWS Cognito service and click “Manage Identity Pools”.
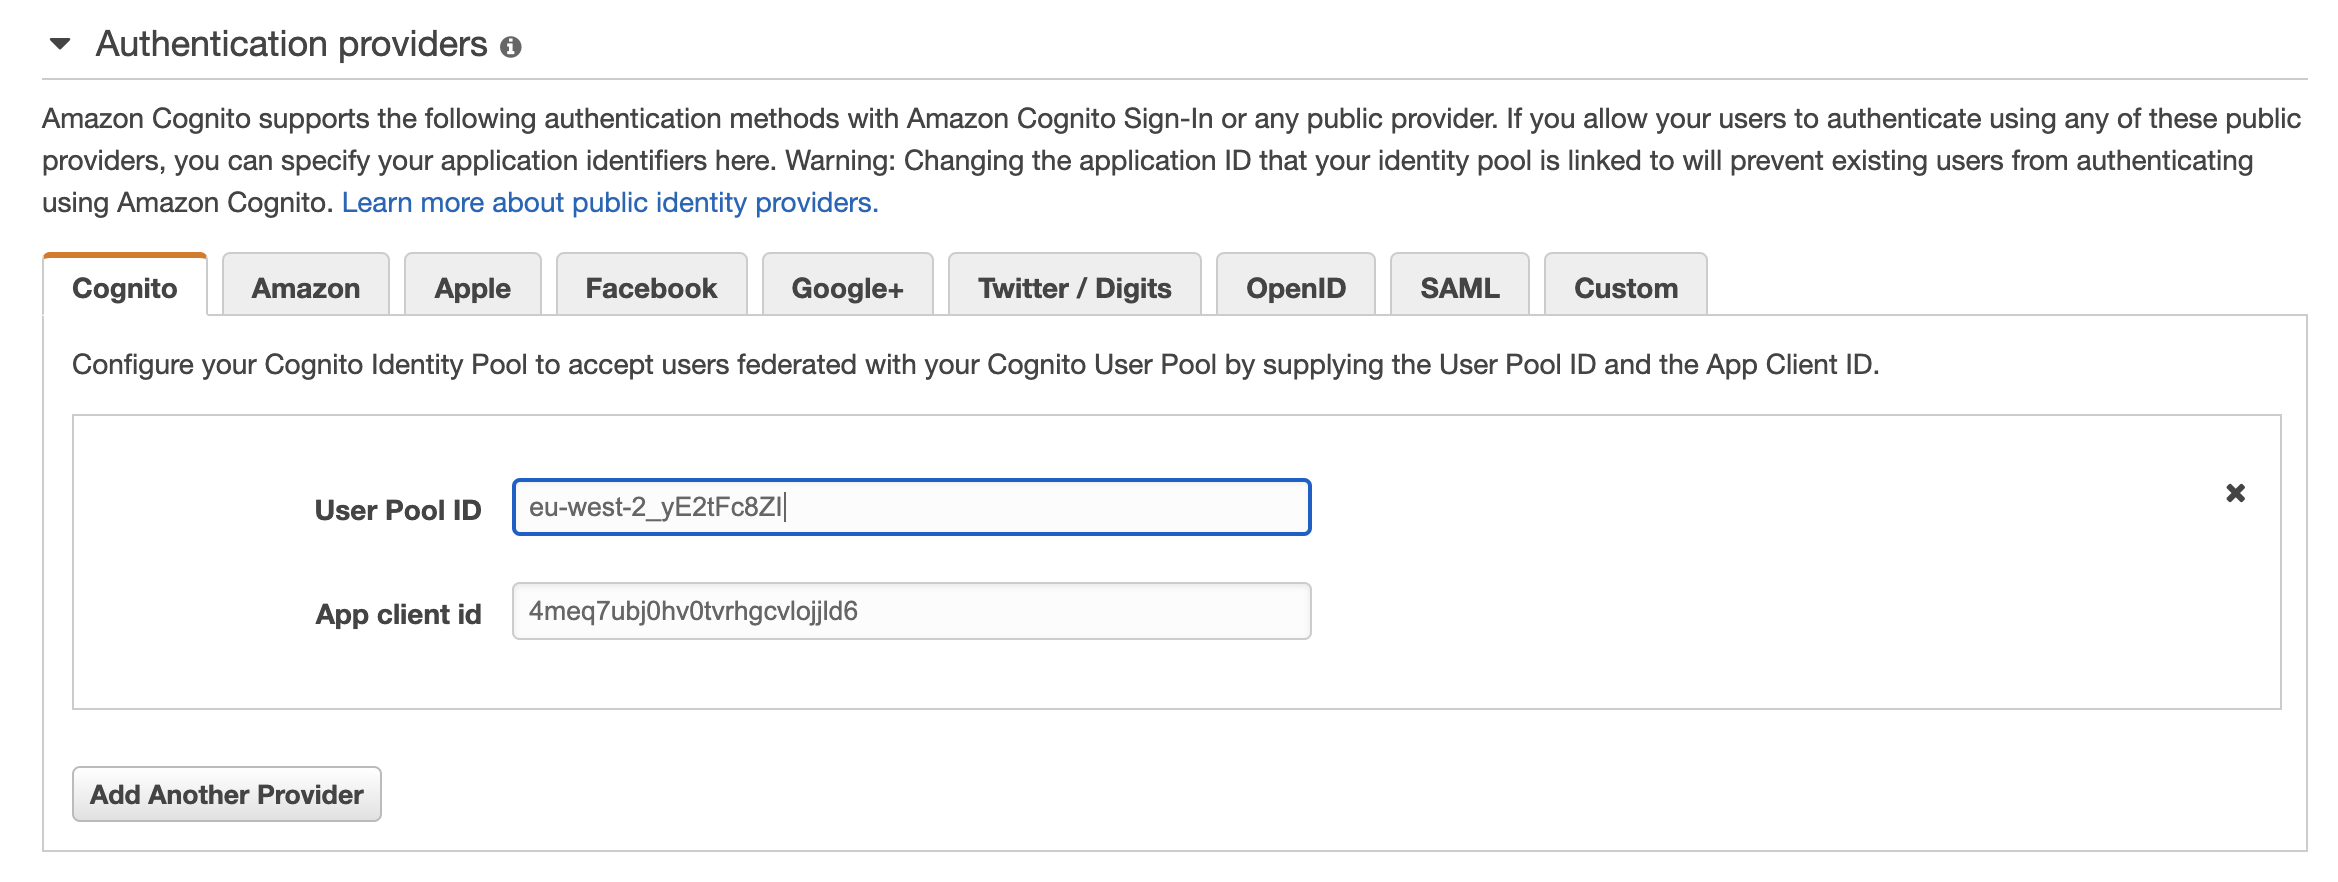
- Enter “Identity pool name”, expand the “Authentication providers” section and select “Cognito” tab. This is where the Cognito authentication provider will be registered with the Identity pool.
- For the field “User Pool ID” paste the “Pool id” copied and for the field “App client id” paste the “App client id” copied as below and click “Create Pool”.
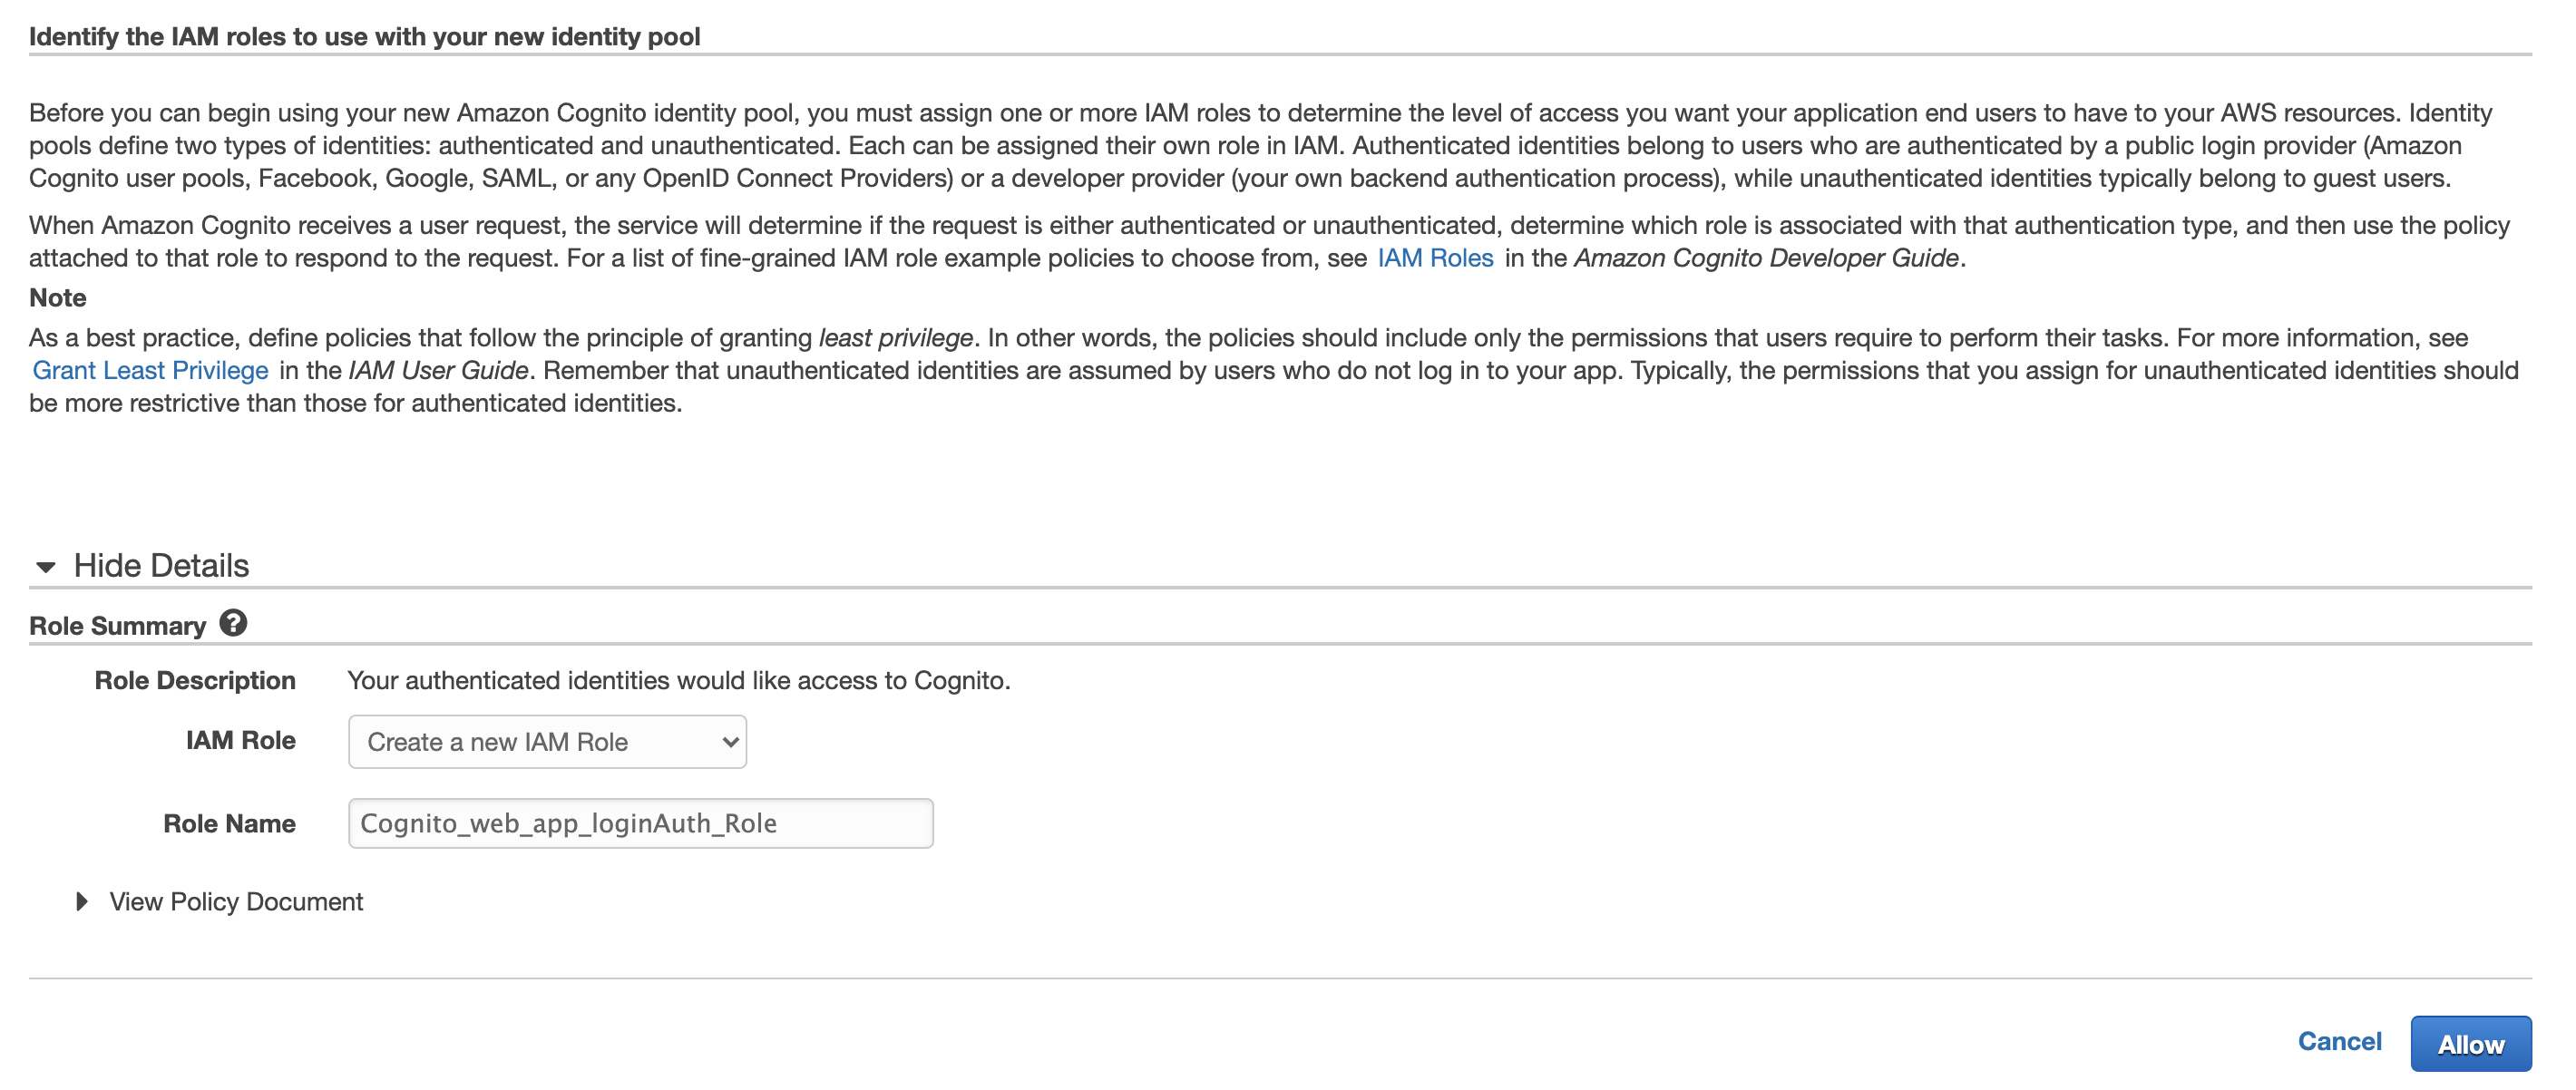
- In the next “Your Cognito identities require access to your resources” page, take note of the IAM Roles that will be created for authenticated and unauthenticated users as displayed below. Necessary IAM Role Policy will need to be given to these roles. In this example, the authenticated user role which is “Cognito_web_app_loginAuth_Role” will be given full AWS S3 access. This will be done in the next step. Click “Allow” to finish creating Identity Pool.
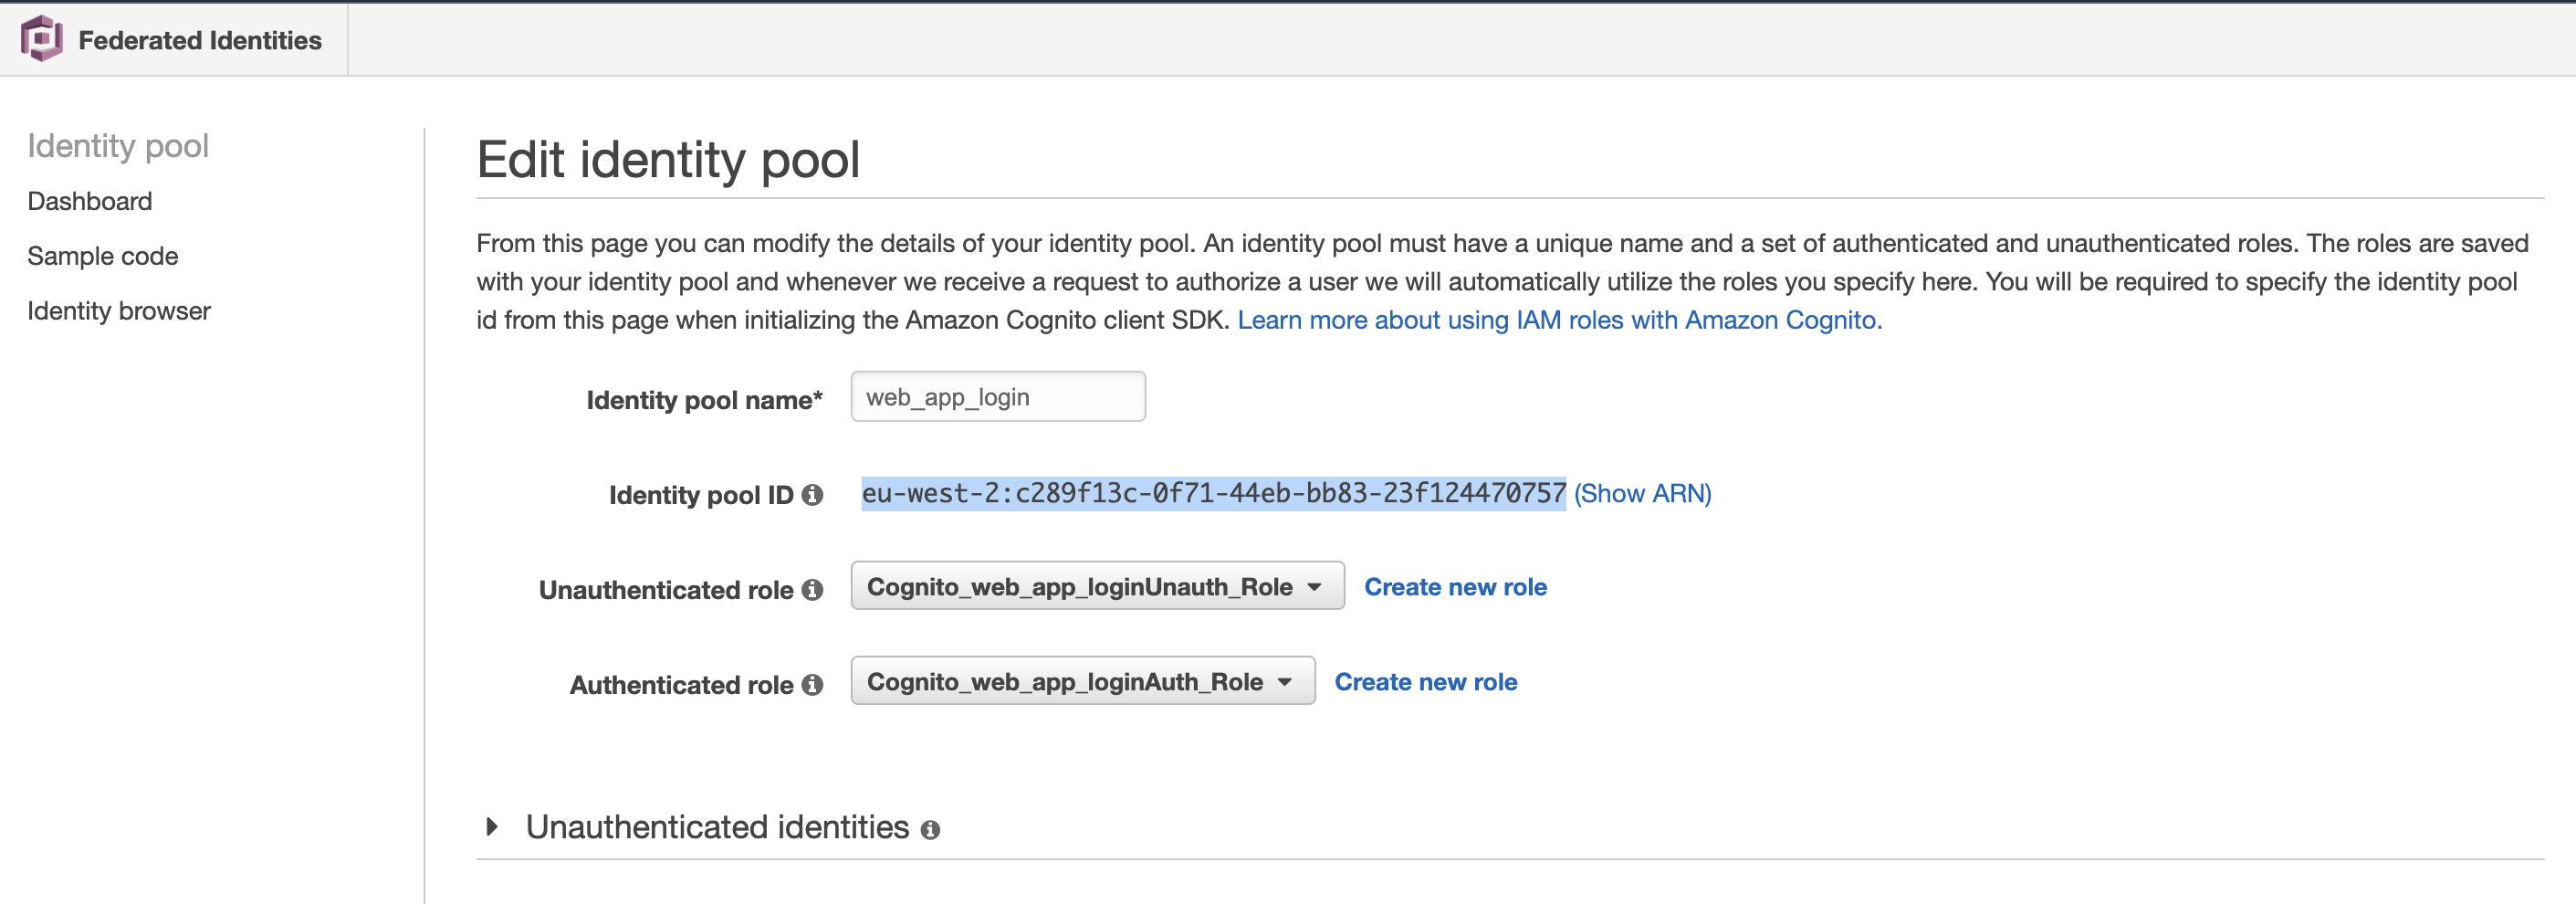
- After creation go to the created Identity pool dashboard and click “Edit Identity Pool” and copy the “Identity pool ID” as displayed below.
Allow AWS Resource Access to Identity Pool Role
-
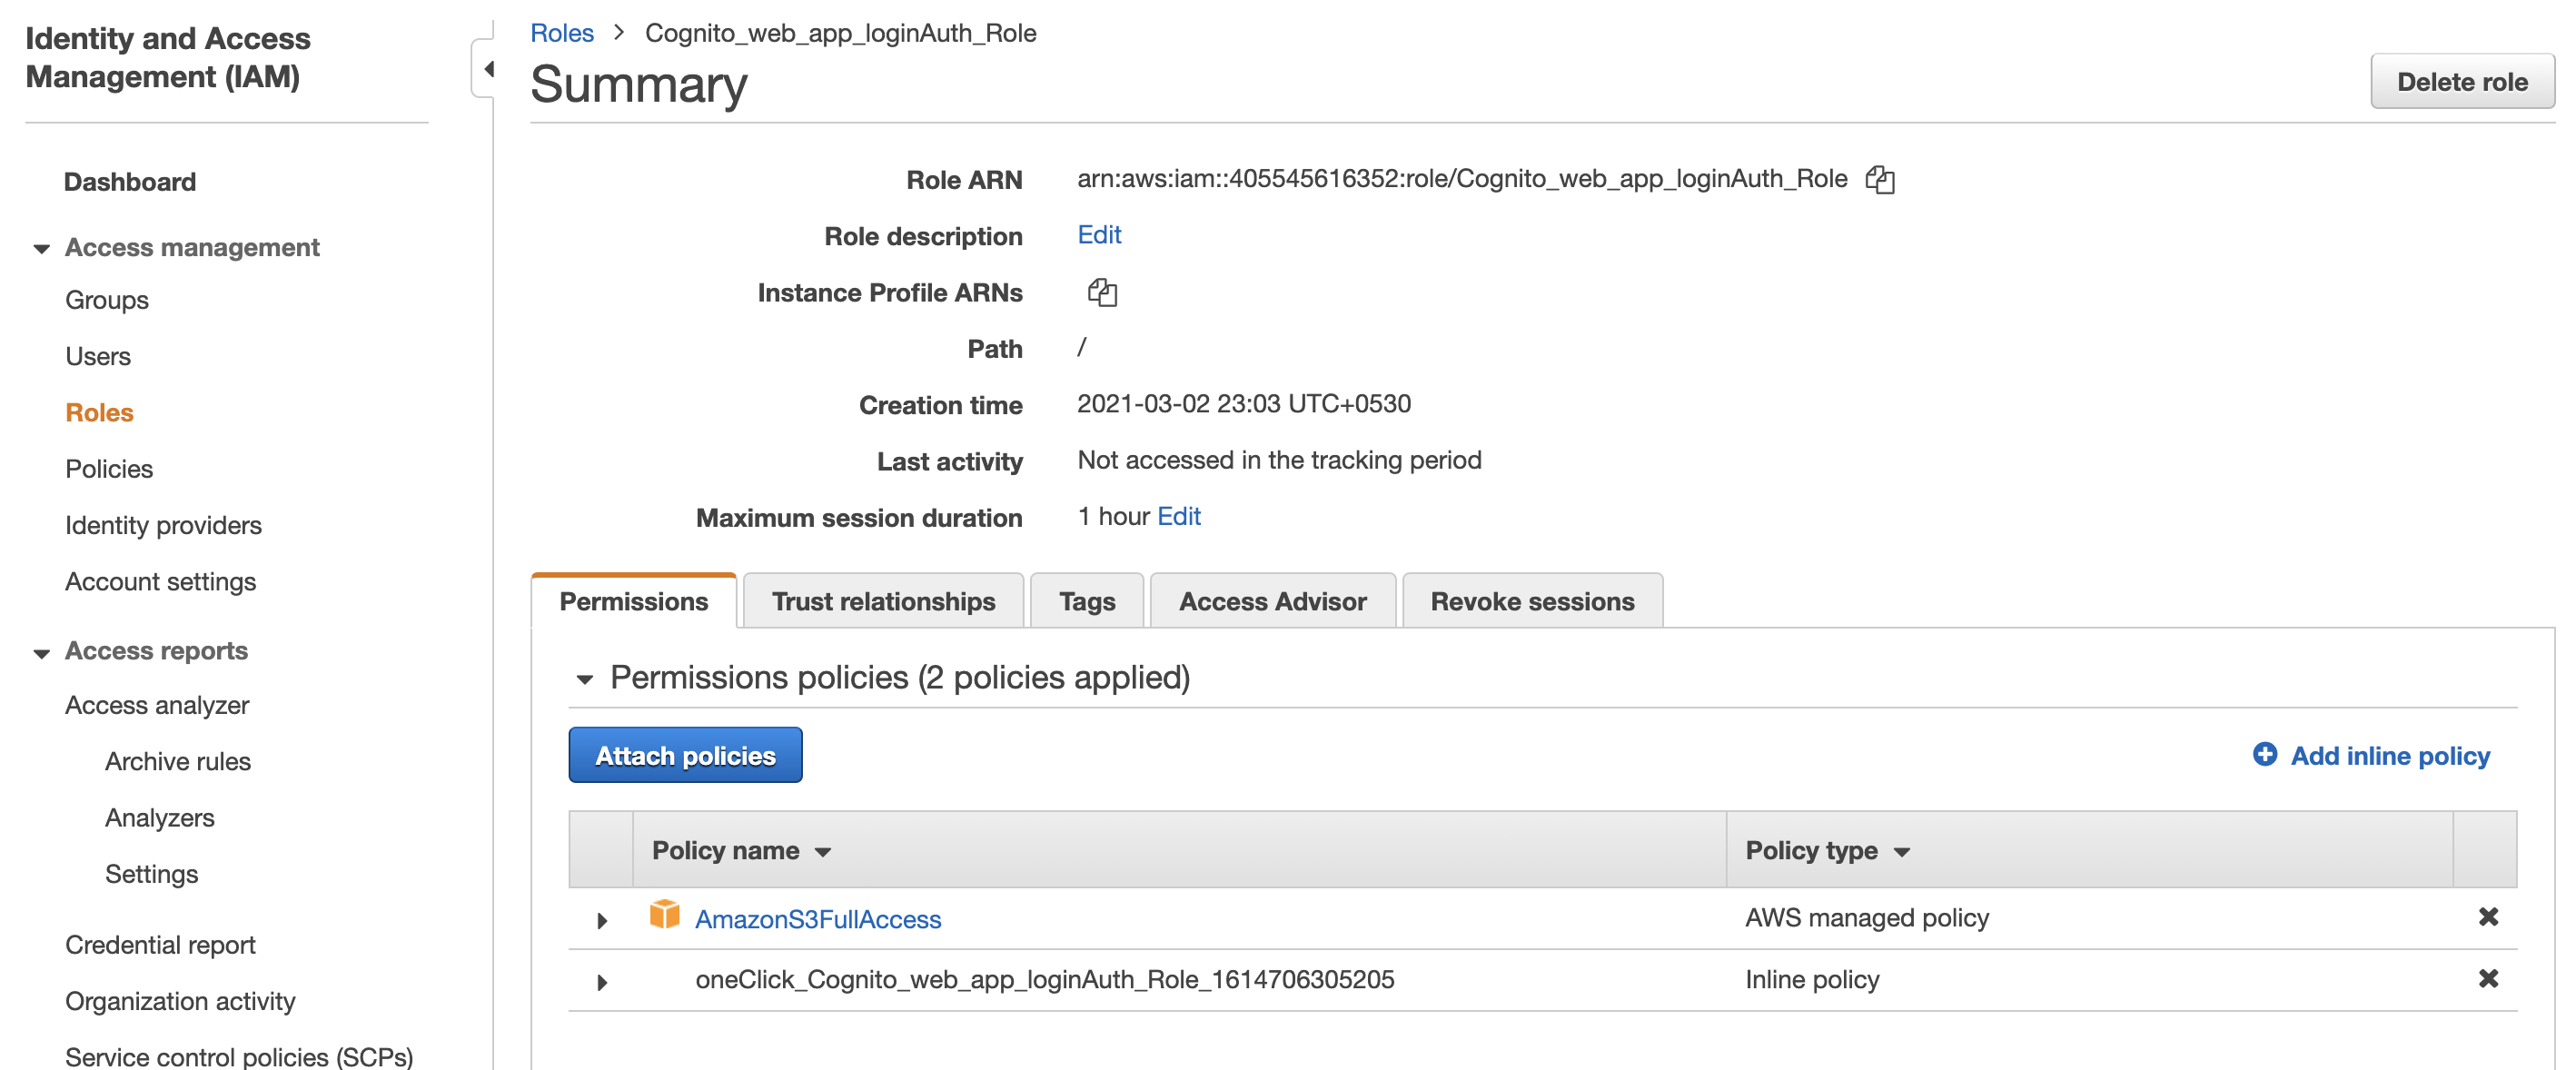
Go to AWS IAM Service -> Roles and find the role “Cognito_web_app_loginAuth_Role” and click “Attach policies”.
-
Search and add “AmazonS3FullAccess” as below and click “Attach policy”. Now any authenticated user that will assume this role will have access to work with AWS S3.
S3 Bucket
Creating an S3 Bucket for Public and Private Access
Lets Create 2 Buckets one for Public Access the Second for Private Content.
- Go to AWS S3 page and click “Create bucket”.
- Enter a “Bucket name” and click “Next”.
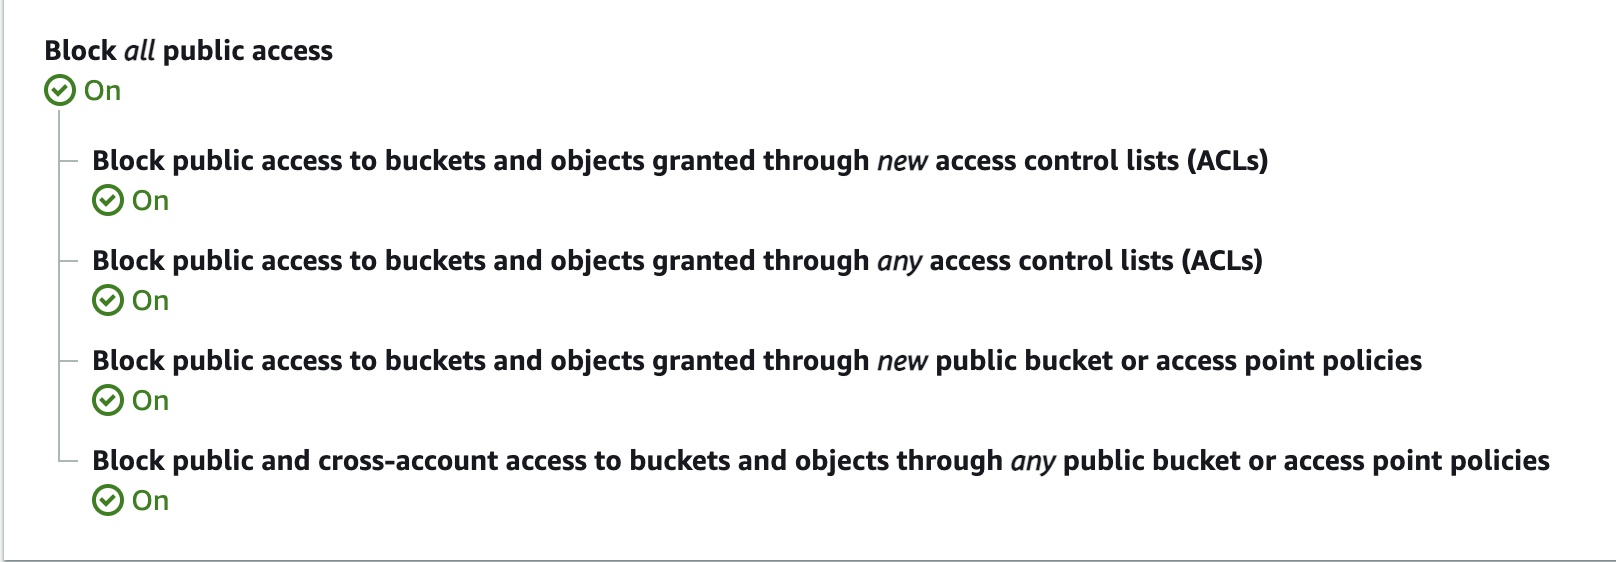
- In “Set permissions” section, set the permissions as below.
Note: For Public Bucket refer the following.

Note: For Private Bucket refer the following.
- Click on the created bucket and go to bucket properties.
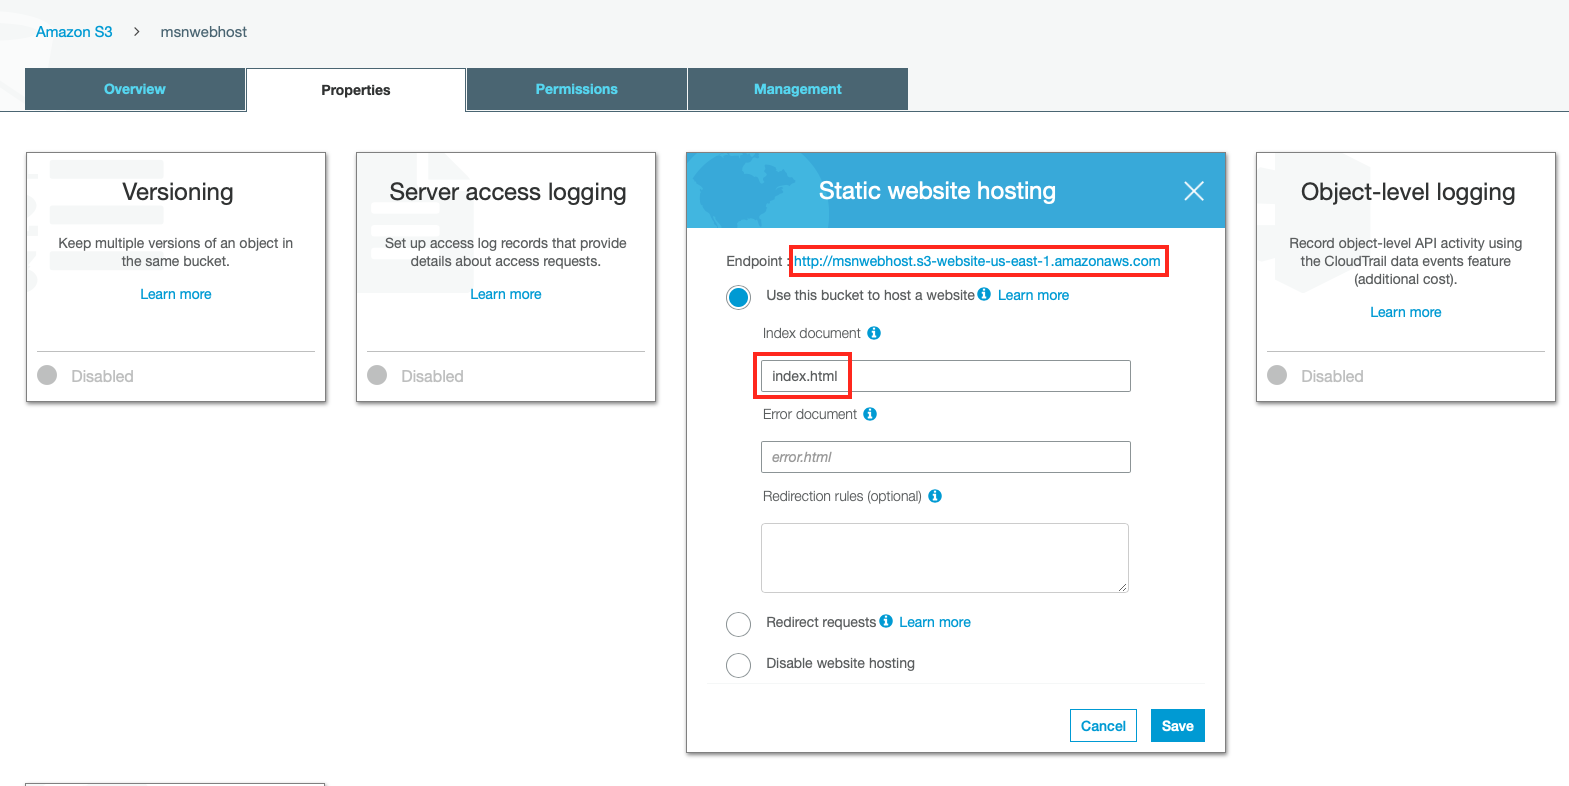
- Enable the “Static website hosting” and configure as below. Enter “Index document” as “index.html”. Copy the “Endpoint” URL as the web app that will be hosted is accessed using this endpoint later.
- Click on “Permissions” tab and go to “CORS configuration” and paste the below XML code and click “Save”. This will allow cross origin access.
[
  {
    "AllowedHeaders": ["*"],
    "AllowedMethods": ["POST", "GET", "PUT"],
    "AllowedOrigins": ["*"],
    "ExposeHeaders": []
  }
]
Creating and Hosting The Web App
-
Go to this Github Repo and get the code for the “public_s3_website” folder. This is a very simple static html page with Javascript which will check for token in URl and redirect to appropriate path.
-
Check the
onload="getToken()"function in body for clear understanding. -
Open
config.jsfile and update the following.
var UserPoolId = "USER_POOL_ID";
var ClientId = "APP_CLIENT_ID";
var AWSRegion = "eu-west-2";
var BaseUrl = "CLOUD_FRONT_URL";
Note: The CLOUD_FRONT_URL will be generated in next step.
-
Upload the files to S3 Bucket.
-
For Private Bucket content, Go to this Github Repo and get the code for the “private_s3_website” folder. This is a very simple static html page, we will see once on succesfull login. Upload the files to S3 Bucket.
CloudFront
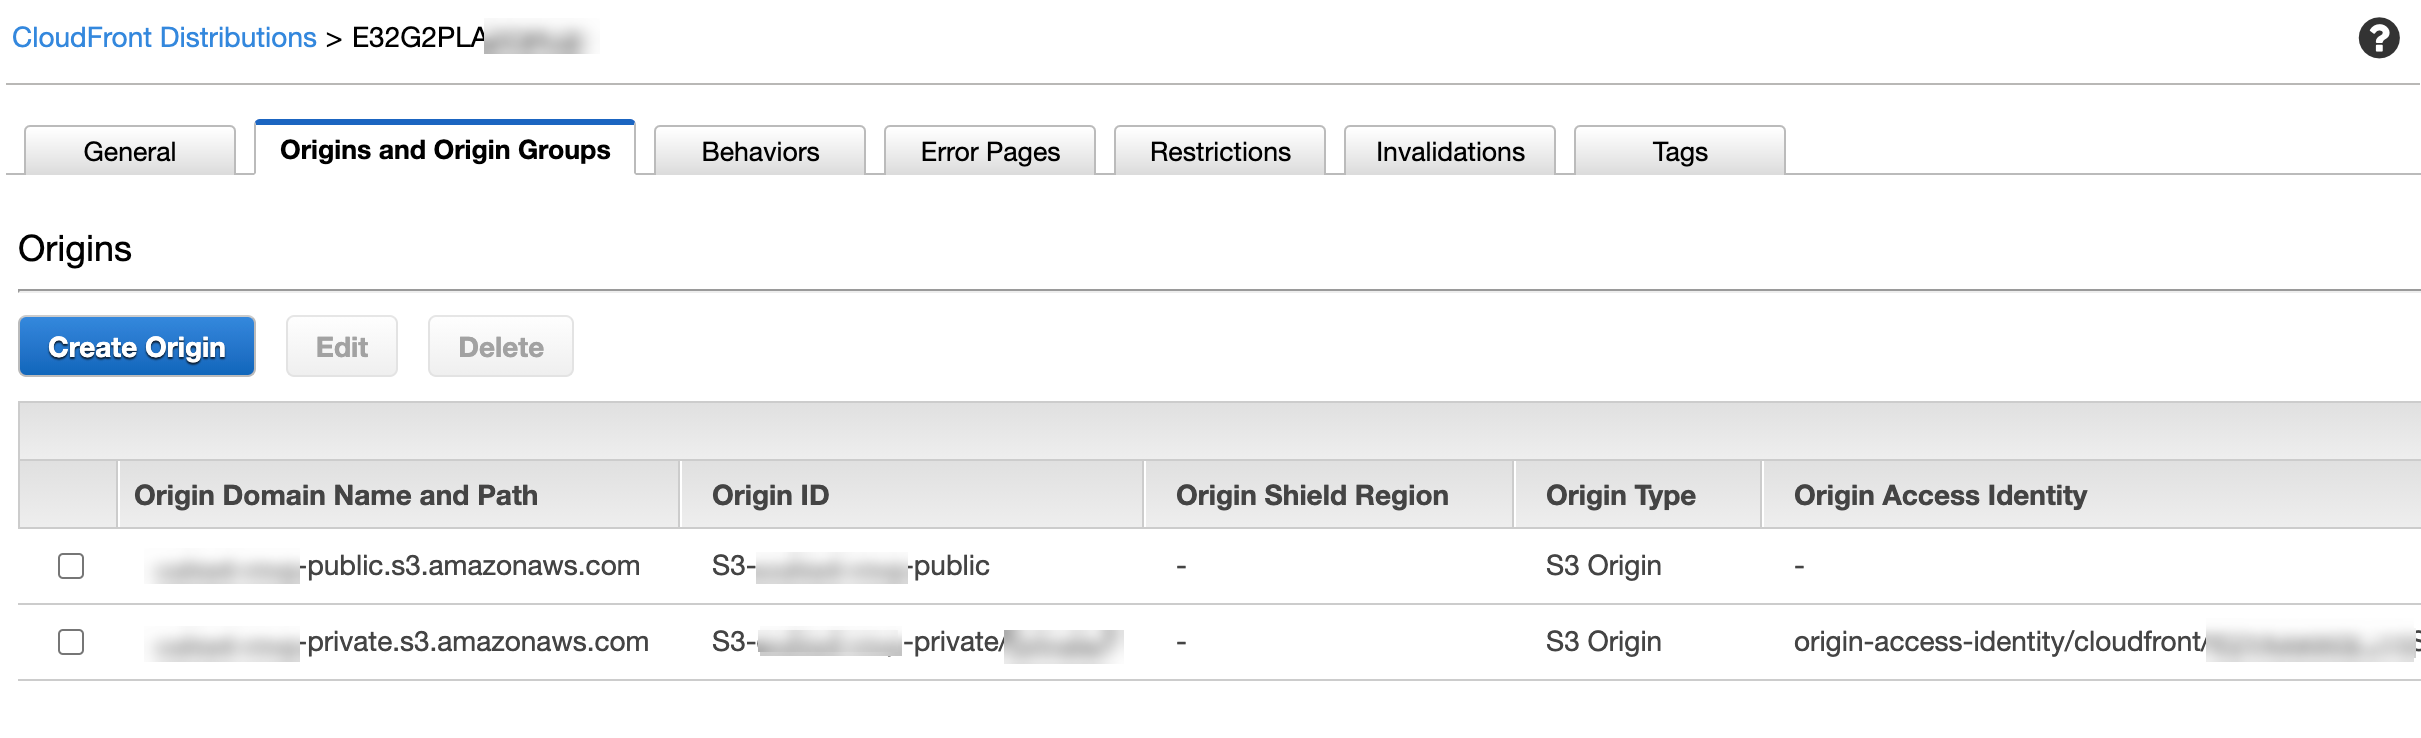
We need to create 3 CloudFront Behaviors as like below image.

First add Origins and Origin Groups, Add the Private & Public S3 created in the above steps.
For Default(*) Public Behaviour:
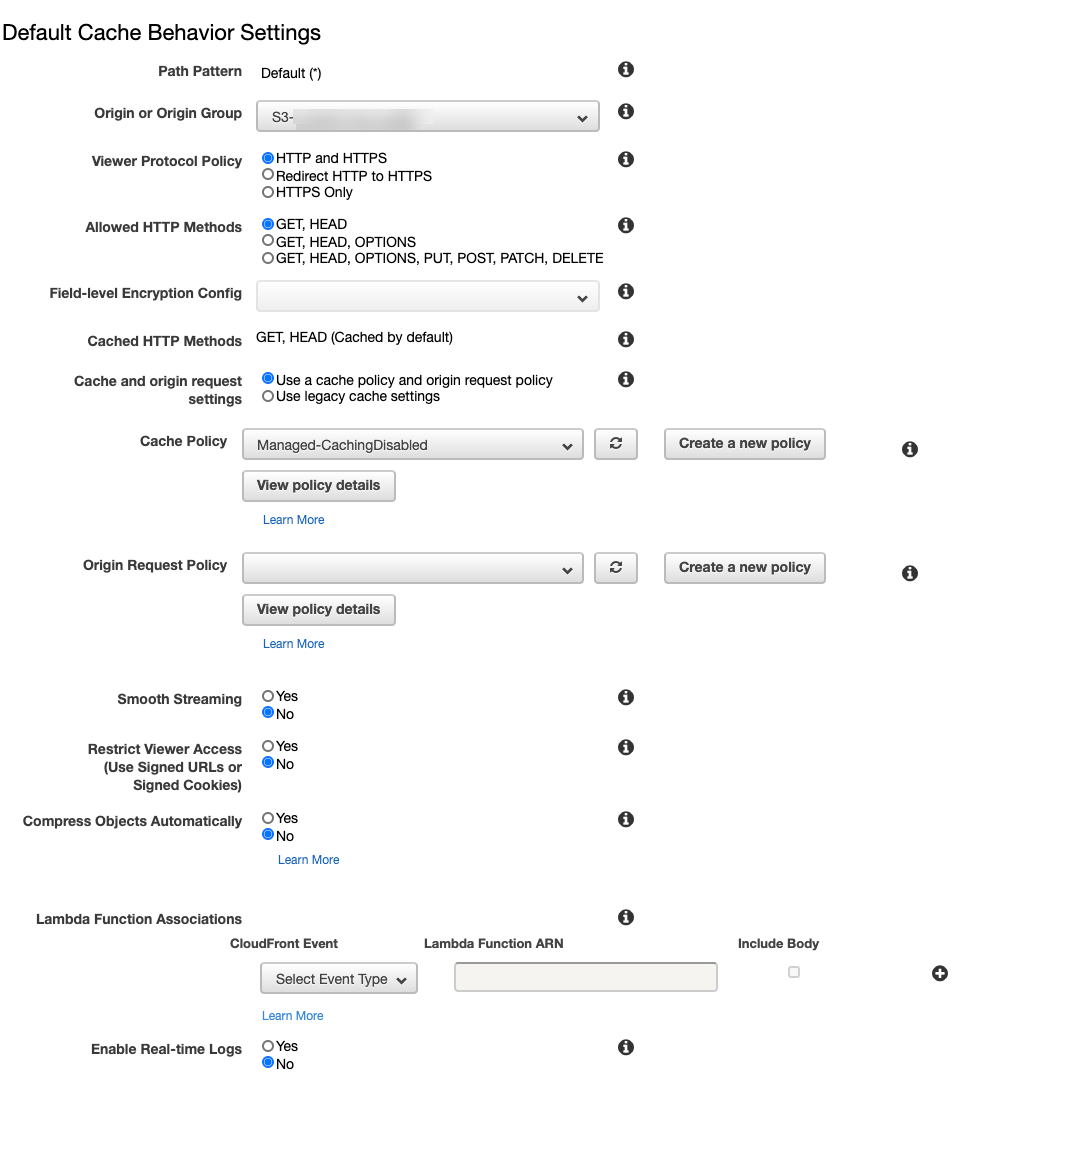
Origin or Origin Group - Public Bucket
For private/login to validate JWT:
Lets first create a Lambda@edge
Lambda@edge
Lambda@Edge is a service that allows you to execute Lambda functions that modify the behaviour of CloudFront specifically. Lambda@Edge simply runs during the request cycle and makes logical decisions that affect the delivery of the CloudFront content.
Creating Lambda@Edge function to Authorize access
We need to create a Lambda@Edge function that will validate authorization with JWT when the related chunk is requested.
First of all, create a new Lambda in N. Virginia — where all Lambda@Edge functions live.
Any request to private/login will be subject to authorization using JWT that client is expected to send in the headers. Validation of JWT token consists of the following steps:
Check if the JWT token is present and has a valid structure Ensure that JWT token was generated by the trusted User Pool Validate JWT signature.
The full code is available in the GitHub repository.
Useful Resource:
https://cognito-idp.eu-west-2.amazonaws.com//.well-known/jwks.jsonto get - JWKS- Setting signed cookies using a custom policy - https://docs.aws.amazon.com/AmazonCloudFront/latest/DeveloperGuide/private-content-setting-signed-cookie-custom-policy.html
Set-Cookie:
  - CloudFront-Policy
  - CloudFront-Signature
  - CloudFront-Key-Pair-Id
- Create a key pair for a trusted key group: https://docs.aws.amazon.com/AmazonCloudFront/latest/DeveloperGuide/private-content-trusted-signers.html#private-content-creating-cloudfront-key-pairs Kindy update the key to Secret Manager and refer in the lambda.
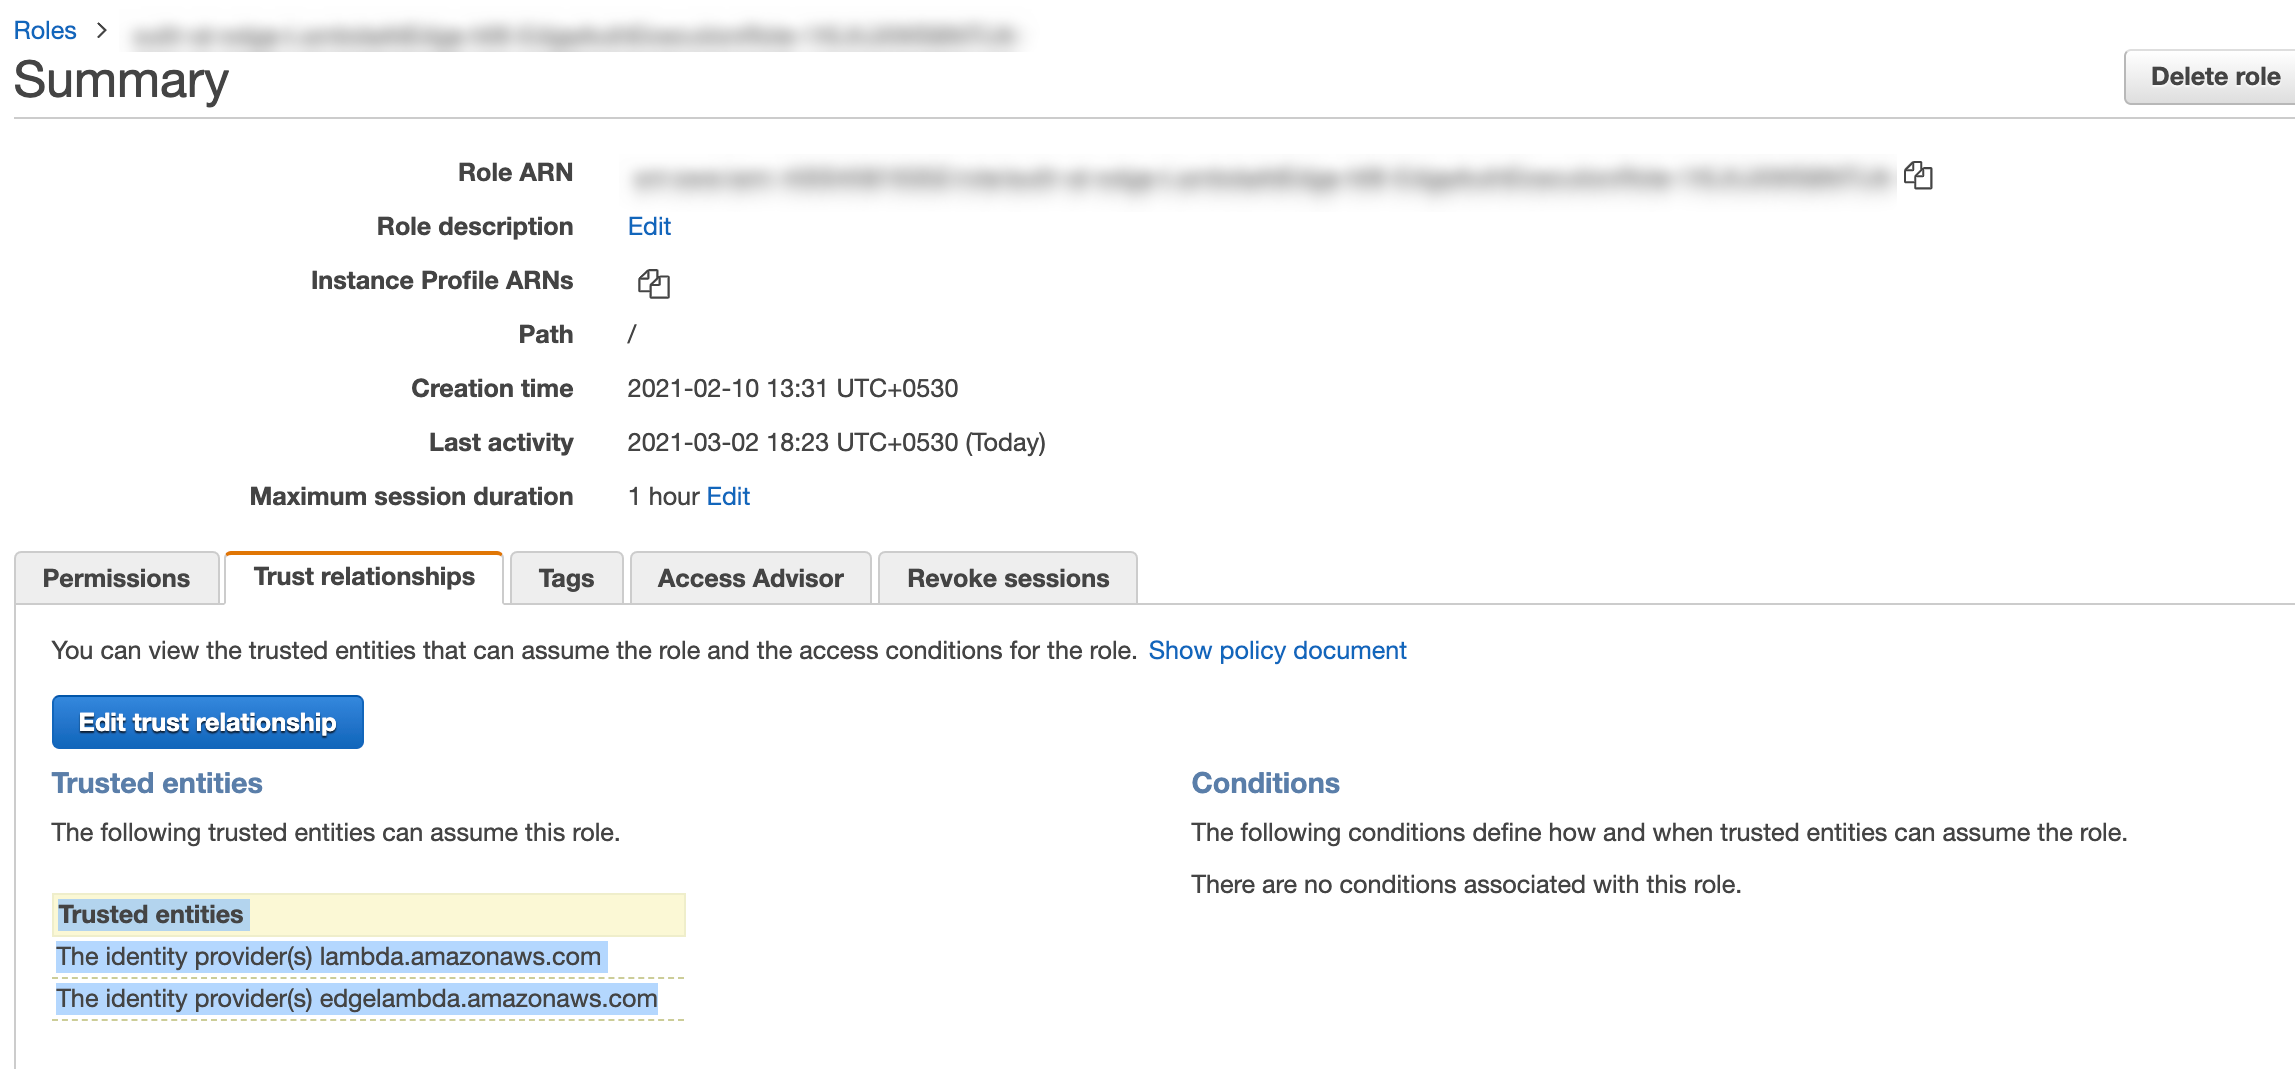
- Our lambda IAM Role should have the following:
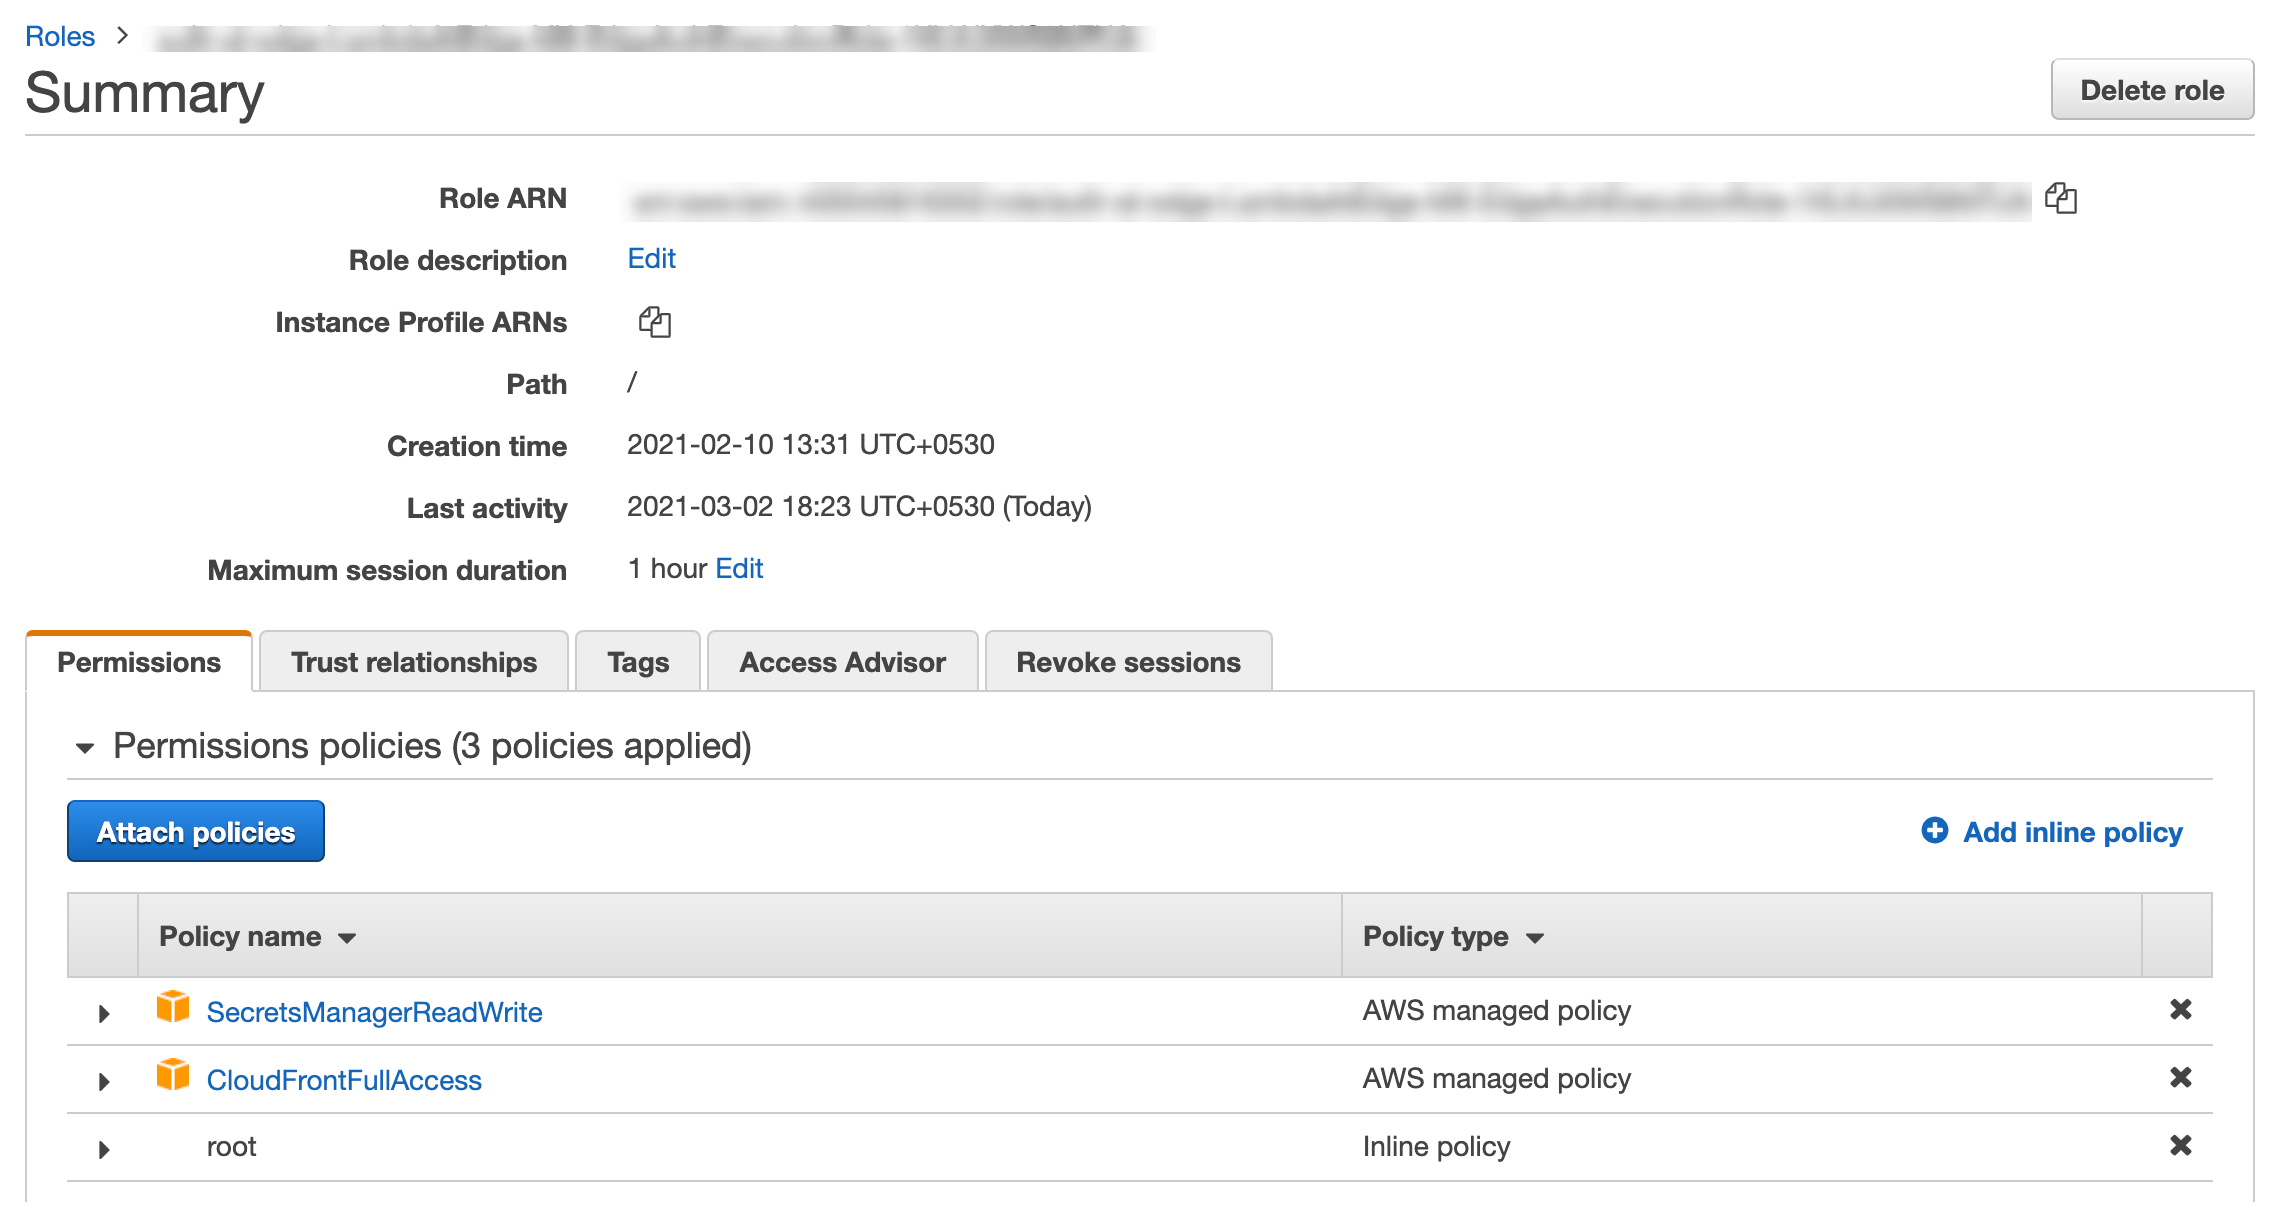
Please Refer code in repo for detailed understanding.
Once the Lambda is deployed copy the ARN, we need to add the ARN to cloudfront behaviour.
Create a new Behavior for private/login.
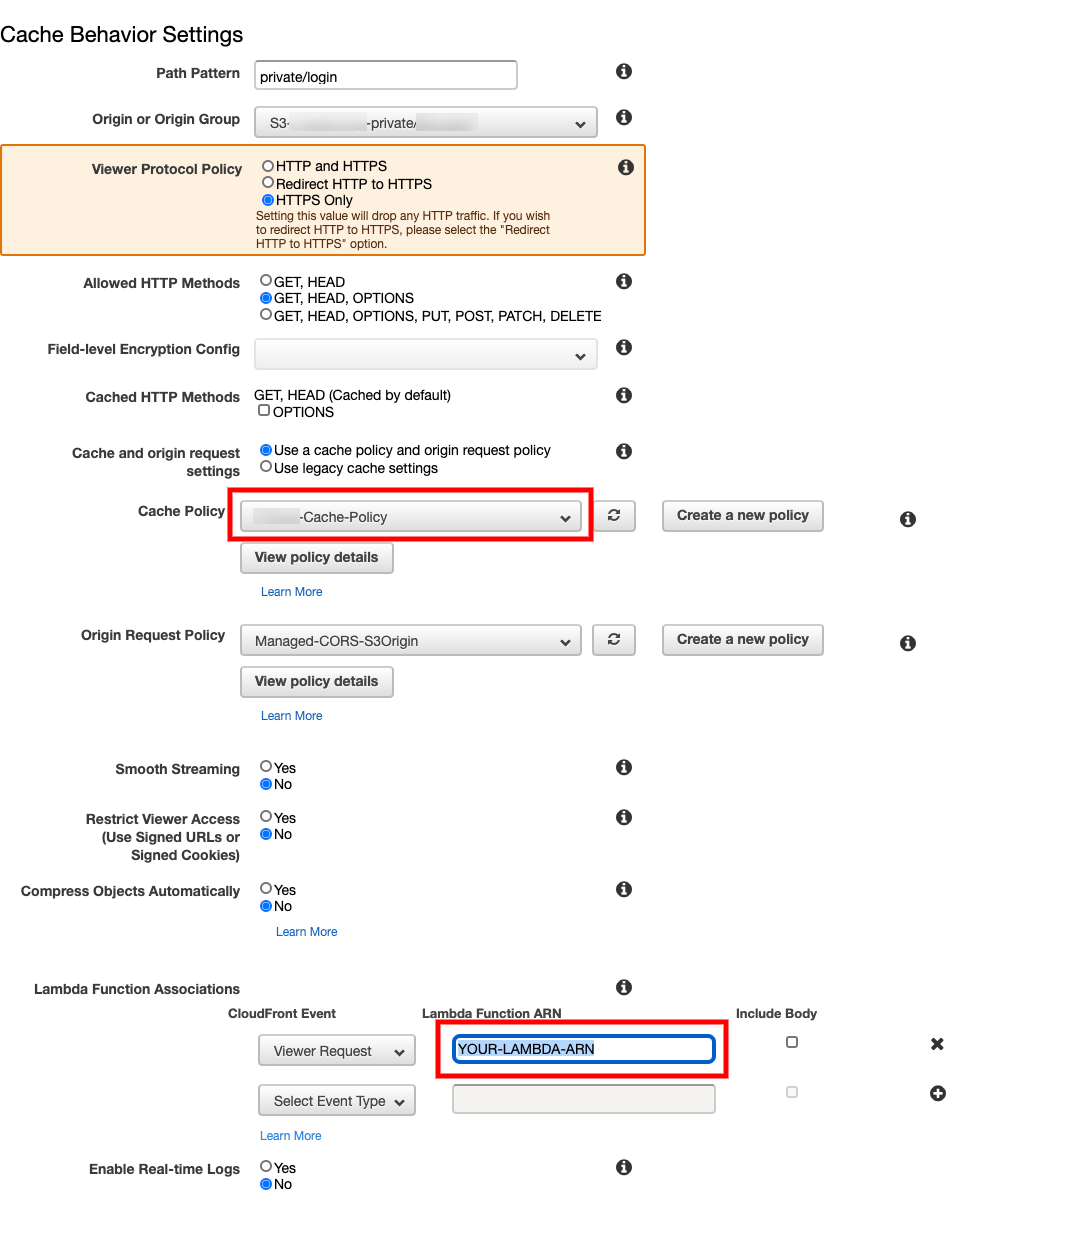
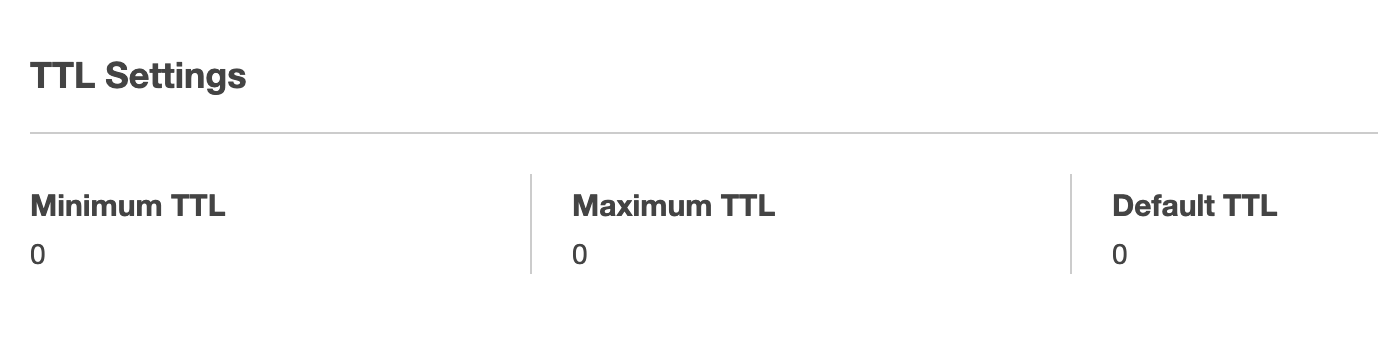
Cache Policy for the above Behavior
Create a new Behavior for private/app/*.
* - Represents anything inside app/ folder.
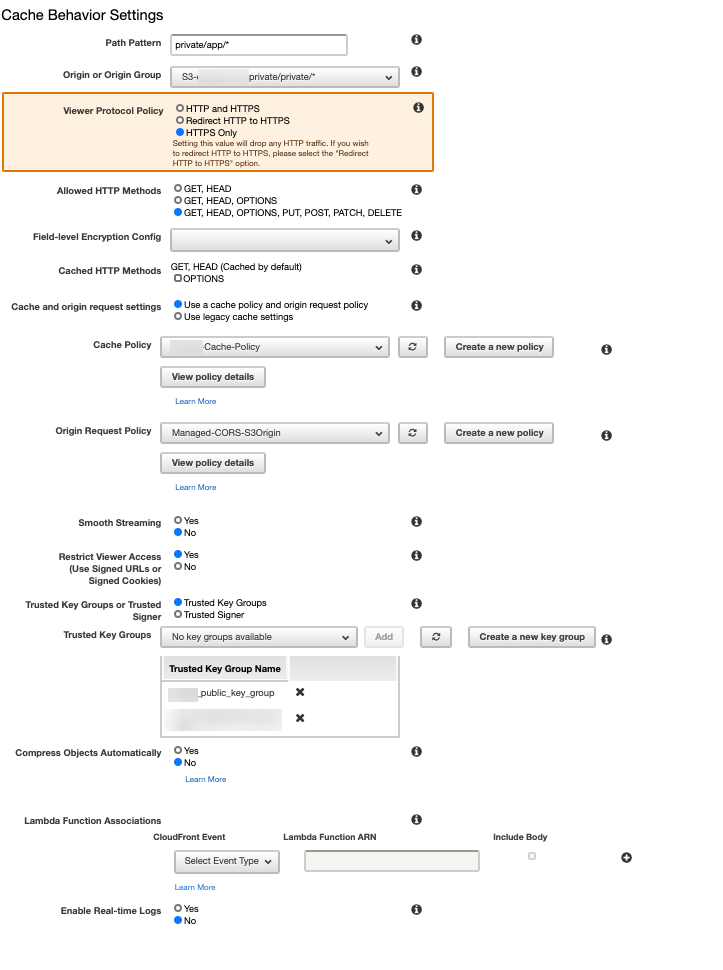
Note: Its important add Trusted Key Groups please refer - Create a key pair for a trusted key group: https://docs.aws.amazon.com/AmazonCloudFront/latest/DeveloperGuide/private-content-trusted-signers.html#private-content-creating-cloudfront-key-pairs Kindy update the key to Secret Manager and refer in the lambda.
How to access the application via Cloudfront
Refer the following image and copy the Doman Name of the Distribution and try access it.
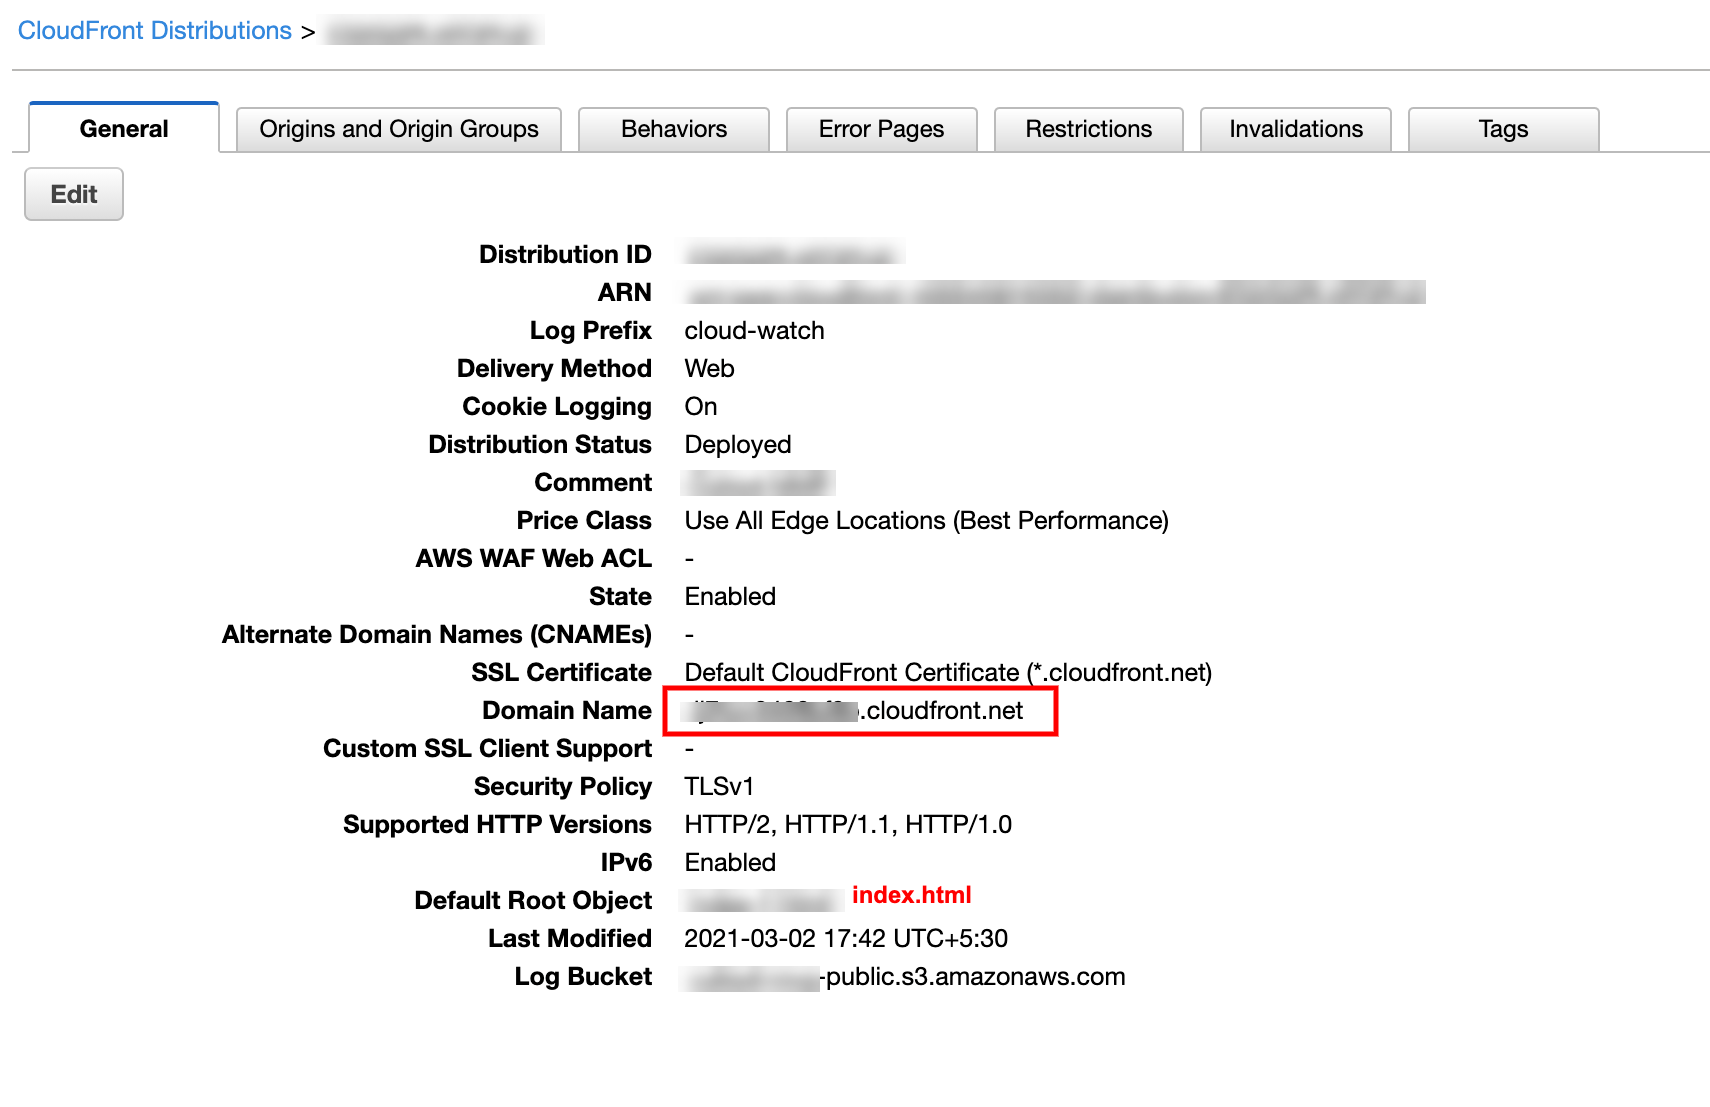
-
You will be re-direct to default page,
index.htmlfield inPublic S3 Bucket, -
It will check for
JWTtoken in the URL, else redirect toCognito -
Once successful login, cognito will redirect to
index.htmlinPublic S3 Bucket -
If the URl has
idtoken, TheJSpresent in theindex.htmlfile will redirect the user toprivate/login. -
The Lambda@Edge associated with the
Behaviourwill validate theJWTtoken withPrivate KeyandJWKSkey. -
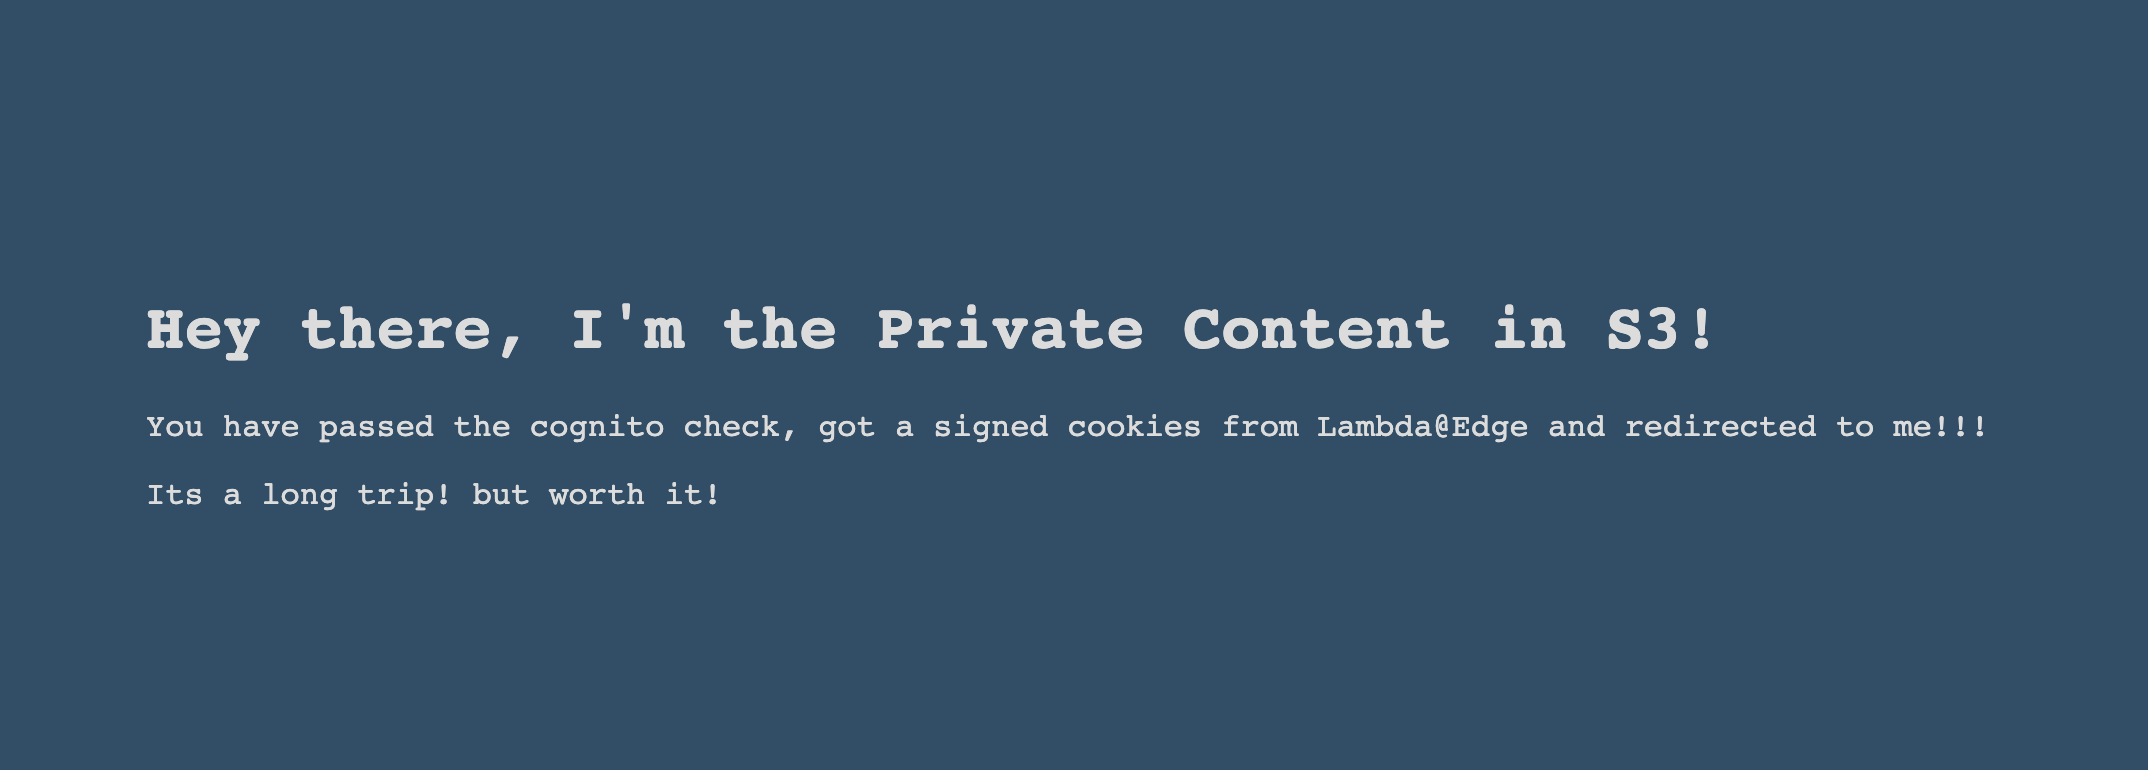
Upon successful validation, The Lambda@Edge code will attach
Signed Cookiesand redirect toprivate/app/index.html. -
The redirection will pass via
CloudFrontthe CF will check the signed cookies and authorise the user to access thePrivate S3 Bucket.
You will see the following content from Private S3 Bucket.
Share your thoughts via twitter @aravind_kumar_g ¯\_(ツ)_/¯