Python Flask automatically generated Swagger 2.0 Document
by DonOfDen
Posted on 30 May 2020
Tags: python flask swagger document
NOTE:
If your looking for Swagger 3.0/openapi documentation and endup here, feel free to check my other post where I have explained about Python Flask automatically generated Swagger 3.0/Openapi Document
Python Flask automatically generated Swagger 2.0 Document
This article will describe how to get started with the python flask, so we can write API spec document. We’ll leave out application specific aspects like authentication and database access and will focus on the basics. As an example, we’ll build a simple REST-ful API.
The following has been tested on Ubuntu and OS X.
Swagger UI
Swagger UI is part of a suite of technologies for documenting RESTful web services. Swagger has evolved into the OpenAPI specification, currently curated by the Linux Foundation. Once you have an OpenAPI description of your web service, you can use software tools to generate documentation or even boilerplate code (client or server) in a variety of languages.
Swagger UI is a great tool for describing and visualizing RESTful web services. It generates a small webpage, which documents your API
Flask and Flask-RESTPlus / Flask-RestX
Flask is a lightweight web server and framework. We can create a Web API directly with flask. However, the Flask-RESTPlus extension makes it much easier to get started. It also automatically configures a Swagger UI endpoint for the API.
Note: During the development I found out Flask-RESTPlus is dead and a new project is forked as Flask-RestX.
Flask-RESTPlus is dead, long life to Flask-RestX
Flask-RestX
- Flask-RESTX is an extension for Flask that adds support for quickly building REST APIs.
- Flask-RESTX encourages best practices with minimal setup. If you are familiar with Flask.
-
Flask-RESTX should be easy to pick up. It provides a coherent collection of decorators and tools to describe your API and expose its documentation properly (using Swagger).
- Flask-RESTX is a community driven fork of Flask-RESTPlus
Getting started
To show off the features of Flask-RESTX I prepared a small demo application. Which will generate a swagger yaml document for the API.
Prerequisites
You will need to have Python installed on your machine.
I would recommend using Python 3, but Python 2 should work just fine.
To install flask:
pip install flask
To install flask-restx:
pip install flask-restx
Defining your Flask app and RESTX API
Flask and Flask-RESTX make it very easy to get started. Minimal code required to create a working API is just 10 lines long.
With Flask-RESTX, you only import the api instance to route and document your endpoints.
Full Code:
import os
import json, yaml


from flask import Flask, after_this_request, send_file, safe_join, abort
from flask_restx import Resource, Api, fields
from flask_restx.api import Swagger

app = Flask(__name__)
api = Api(
    app=app,
    doc='/docs',
    version='1.0.0',
    title='TEST APP API',
    description='TEST APP API'
    )


response_fields = api.model('Resource', {
    'value': fields.String(required=True, min_length=1, max_length=200, description='example text')
})


# This class will handle POST
@api.route('/demo/', endpoint='demo')
@api.doc(responses={403: 'Not Authorized'})
class DemoList(Resource):
    @api.expect(response_fields, validate=True)
    @api.marshal_with(response_fields, code=200)
    def post(self):
        api.payload["value"] = 'Im the response ur waiting for'
        return api.payload


@api.route('/swagger')
class HelloSwagger(Resource):
    def get(self):
        data = json.loads(json.dumps(api.__schema__))
        with open('yamldoc.yml', 'w') as yamlf:
            yaml.dump(data, yamlf, allow_unicode=True, default_flow_style=False)
            file = os.path.abspath(os.getcwd())
            try:
                @after_this_request
                def remove_file(resp):
                    try:
                        os.remove(safe_join(file, 'yamldoc.yml'))
                    except Exception as error:
                        log.error("Error removing or closing downloaded file handle", error)
                    return resp

                return send_file(safe_join(file, 'yamldoc.yml'), as_attachment=True, attachment_filename='yamldoc.yml', mimetype='application/x-yaml')
            except FileExistsError:
                abort(404)


# main driver function
if __name__ == '__main__':
    app.run(port=5003, debug=True)
Models
The flask-RESTX library introduces 2 main abstractions: models and resources. A model defines the structure/schema of the payload of a request or response. This includes the list of all fields and their types.
response_fields = api.model('Resource', {
    'value': fields.String(required=True, min_length=1, max_length=200, description='example text')
})
Models Field options
All fields share some common options which can change their behavior:
- required – is the field required
- default – default value for the field
- description – field description (will appear in Swagger UI)
- example – optional example value (will appear in Swagger UI)
String:
min_length and max_length – minimum and maximum length of a string
pattern – a regular expression, which the sting must match
Ex:
'name': fields.String(required=True, pattern='^[a-z0-9-]+$', min_length=5, max_length=200)
In our demo we used the following:
'value': fields.String(required=True, min_length=1, max_length=200, description='example text')
Numbers (Integer, Float, Fixed, Arbitrary):
minandmax– minimum and maximum valuesexclusiveMinandexclusiveMax– as above, but the boundary values are not validmultiple– number must be a multiple of this value
Note: You can learn more about RESTPlus /flask-RESTX model fields, by looking at their source code
Resources
A resource is a class whose methods are mapped to an API/URL endpoint. We use flask-RESTX annotations to define the URL pattern for every such class. For every resources class, the method whose names match the HTTP methods (e.g. get, put) will handle the matching HTTP calls.
By using the expect annotation, for every HTTP method we can specify the expected model of the payload body. Similarly, by using the marshal annotations, we can define the respective response payload model.
# This class will handle POST
@api.route('/demo/', endpoint='demo')
@api.doc(responses={403: 'Not Authorized'})
@api.doc(responses={402: 'Not Authorized'})
class DemoList(Resource):
    @api.expect(response_fields, validate=True)
    @api.marshal_with(response_fields, code=200)
    def post(self):
        api.payload["value"] = 'Im the response ur waiting for'
        return api.payload
The above example handles HTTP POST to the /demo endpoint. Based on the expect and marshal annotations, flask-restplus will automatically convert the JSON payloads to dictionaries and vice versa.
Document Details
The main entry point for the application. You need to initialize it with a Flask Application:
app = Flask(__name__)
api = Api(
    app=app,
    doc='/docs',
    version='1.0.0',
    title='TEST APP API',
    description='TEST APP API'
    )
If you didnt specif the doc='/docs' paramaeter the swagger doc will be published in root.
There are lot more options for the documentation check this link for more details.
Document Converter
In this demo I’m tying to convert the generated json document to yaml swagger document. To do that Im utilizing the api.__schema__ of flask-RESTX library and convert that using data = json.loads(json.dumps(api.__schema__)) as a python dict object. rest of the code are to write the yaml in file.
@api.route('/swagger')
class HelloSwagger(Resource):
    def get(self):
        data = json.loads(json.dumps(api.__schema__))
        with open('yamldoc.yml', 'w') as yamlf:
            yaml.dump(data, yamlf, allow_unicode=True, default_flow_style=False)
            file = os.path.abspath(os.getcwd())
            try:
                @after_this_request
                def remove_file(resp):
                    try:
                        os.remove(safe_join(file, 'yamldoc.yml'))
                    except Exception as error:
                        log.error("Error removing or closing downloaded file handle", error)
                    return resp

                return send_file(safe_join(file, 'yamldoc.yml'), as_attachment=True, attachment_filename='yamldoc.yml', mimetype='application/x-yaml')
            except FileExistsError:
                abort(404)
How to RUN and Check:
To run the flask application save the above full code mentioned on Defining your Flask app and RESTX API section as demo.py or whatever you like and run the following command.
python demo.py
Make sure you ahve installed the following packages:
- flask
- flask_restx
- json
- yaml
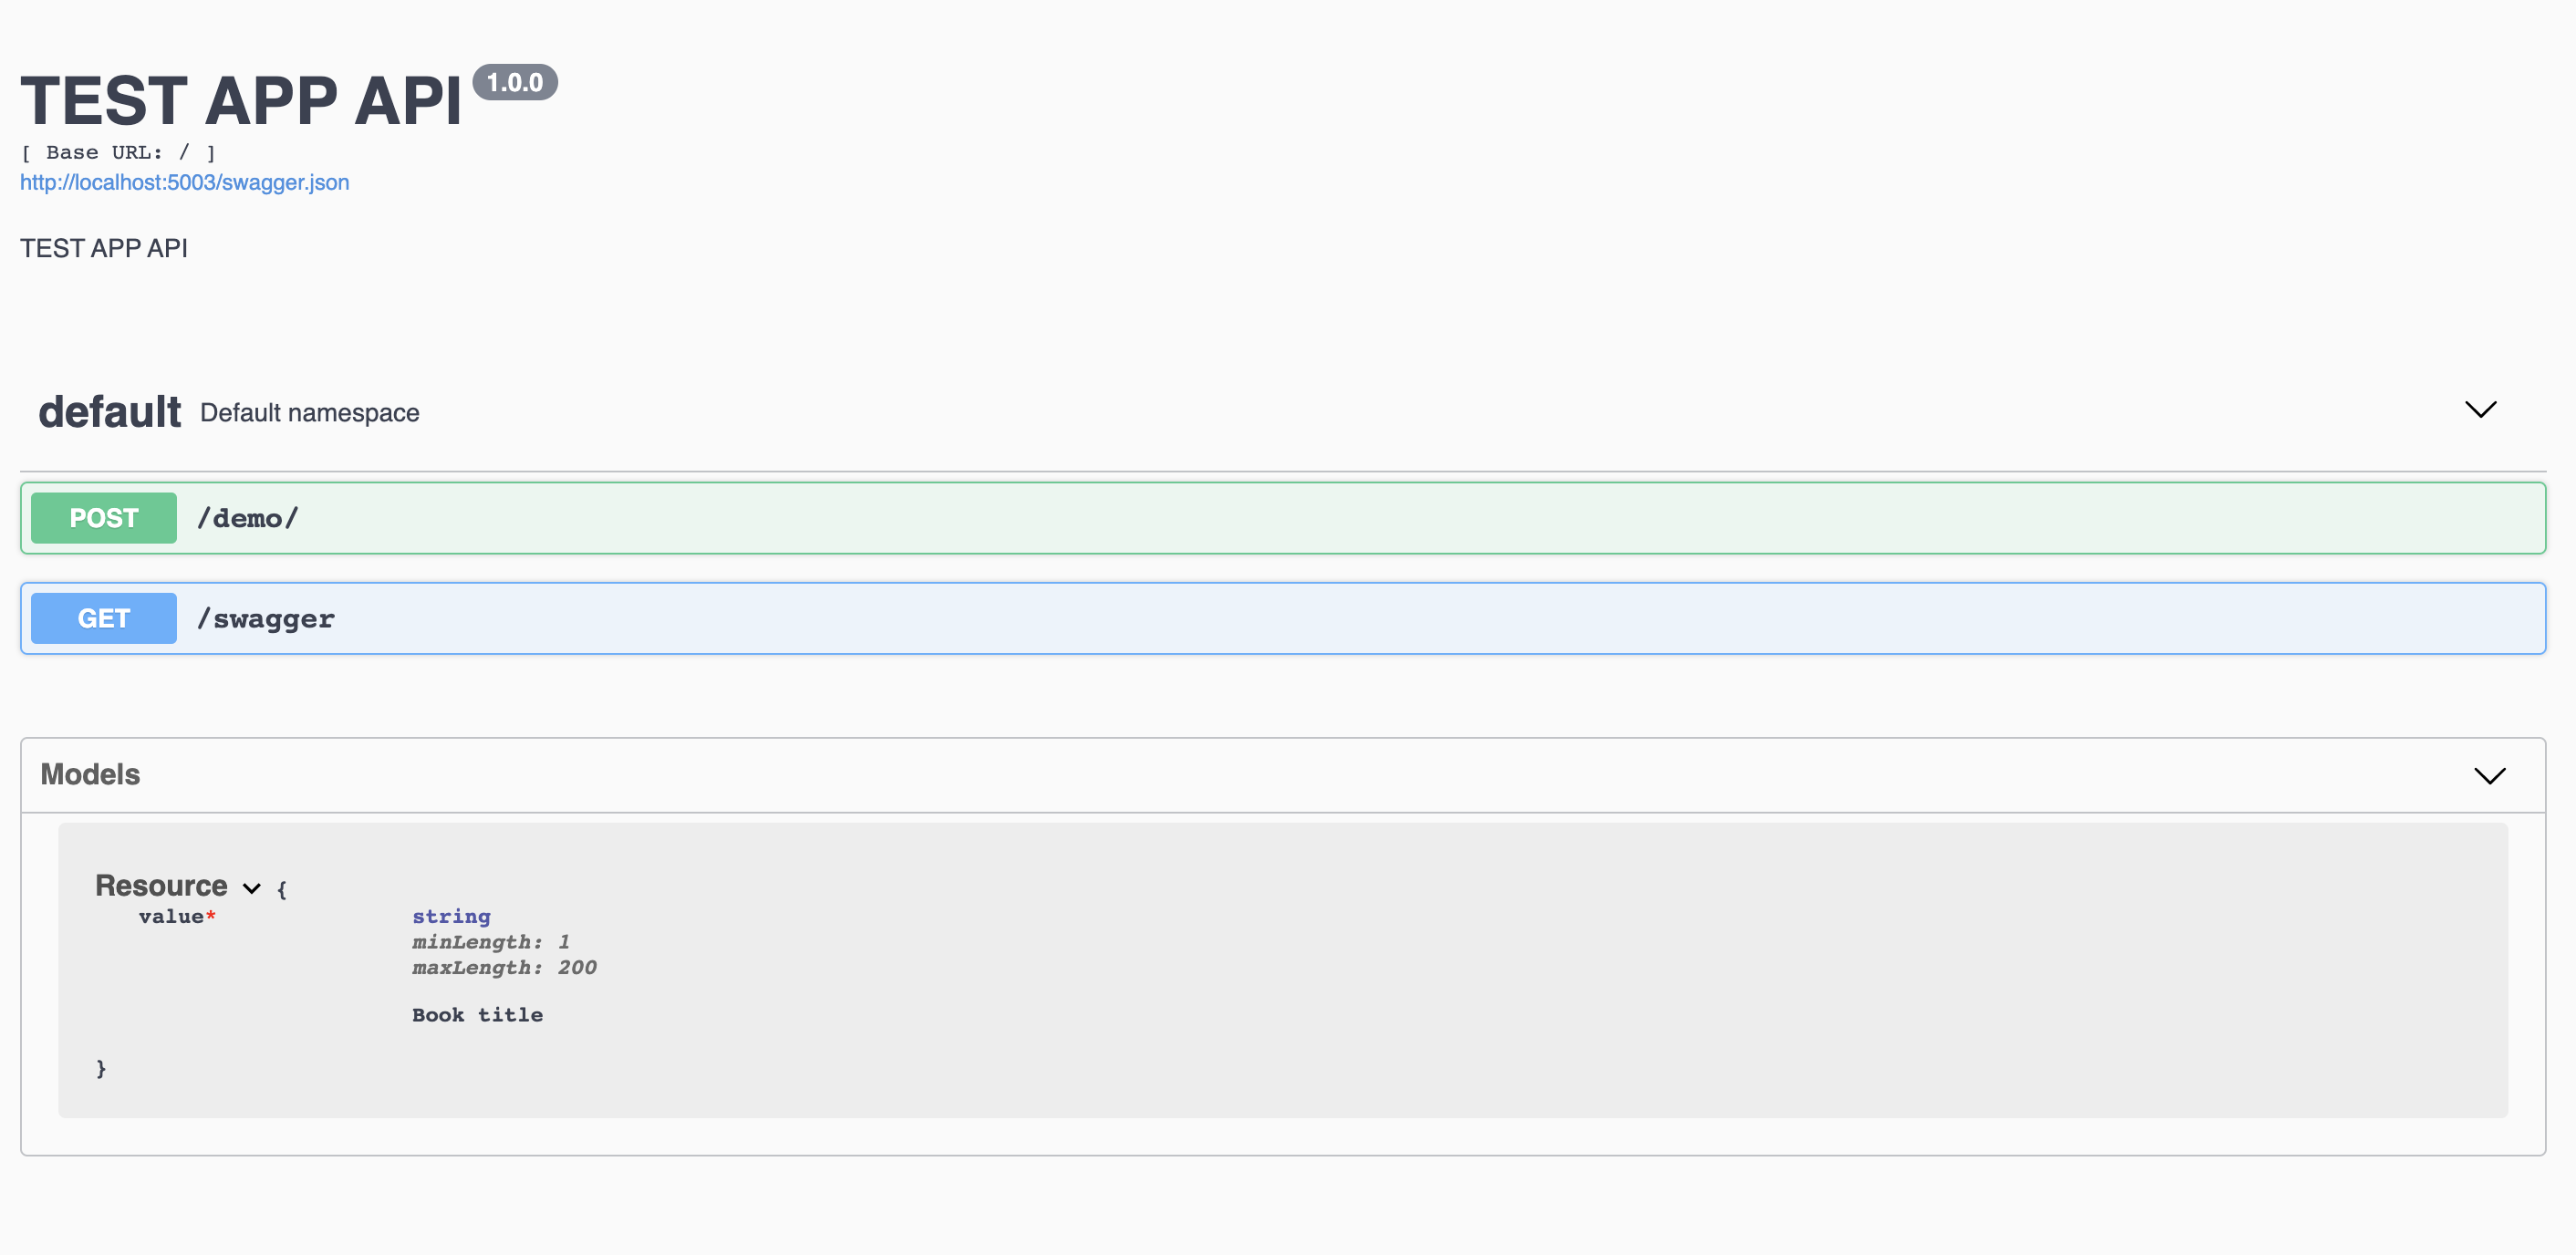
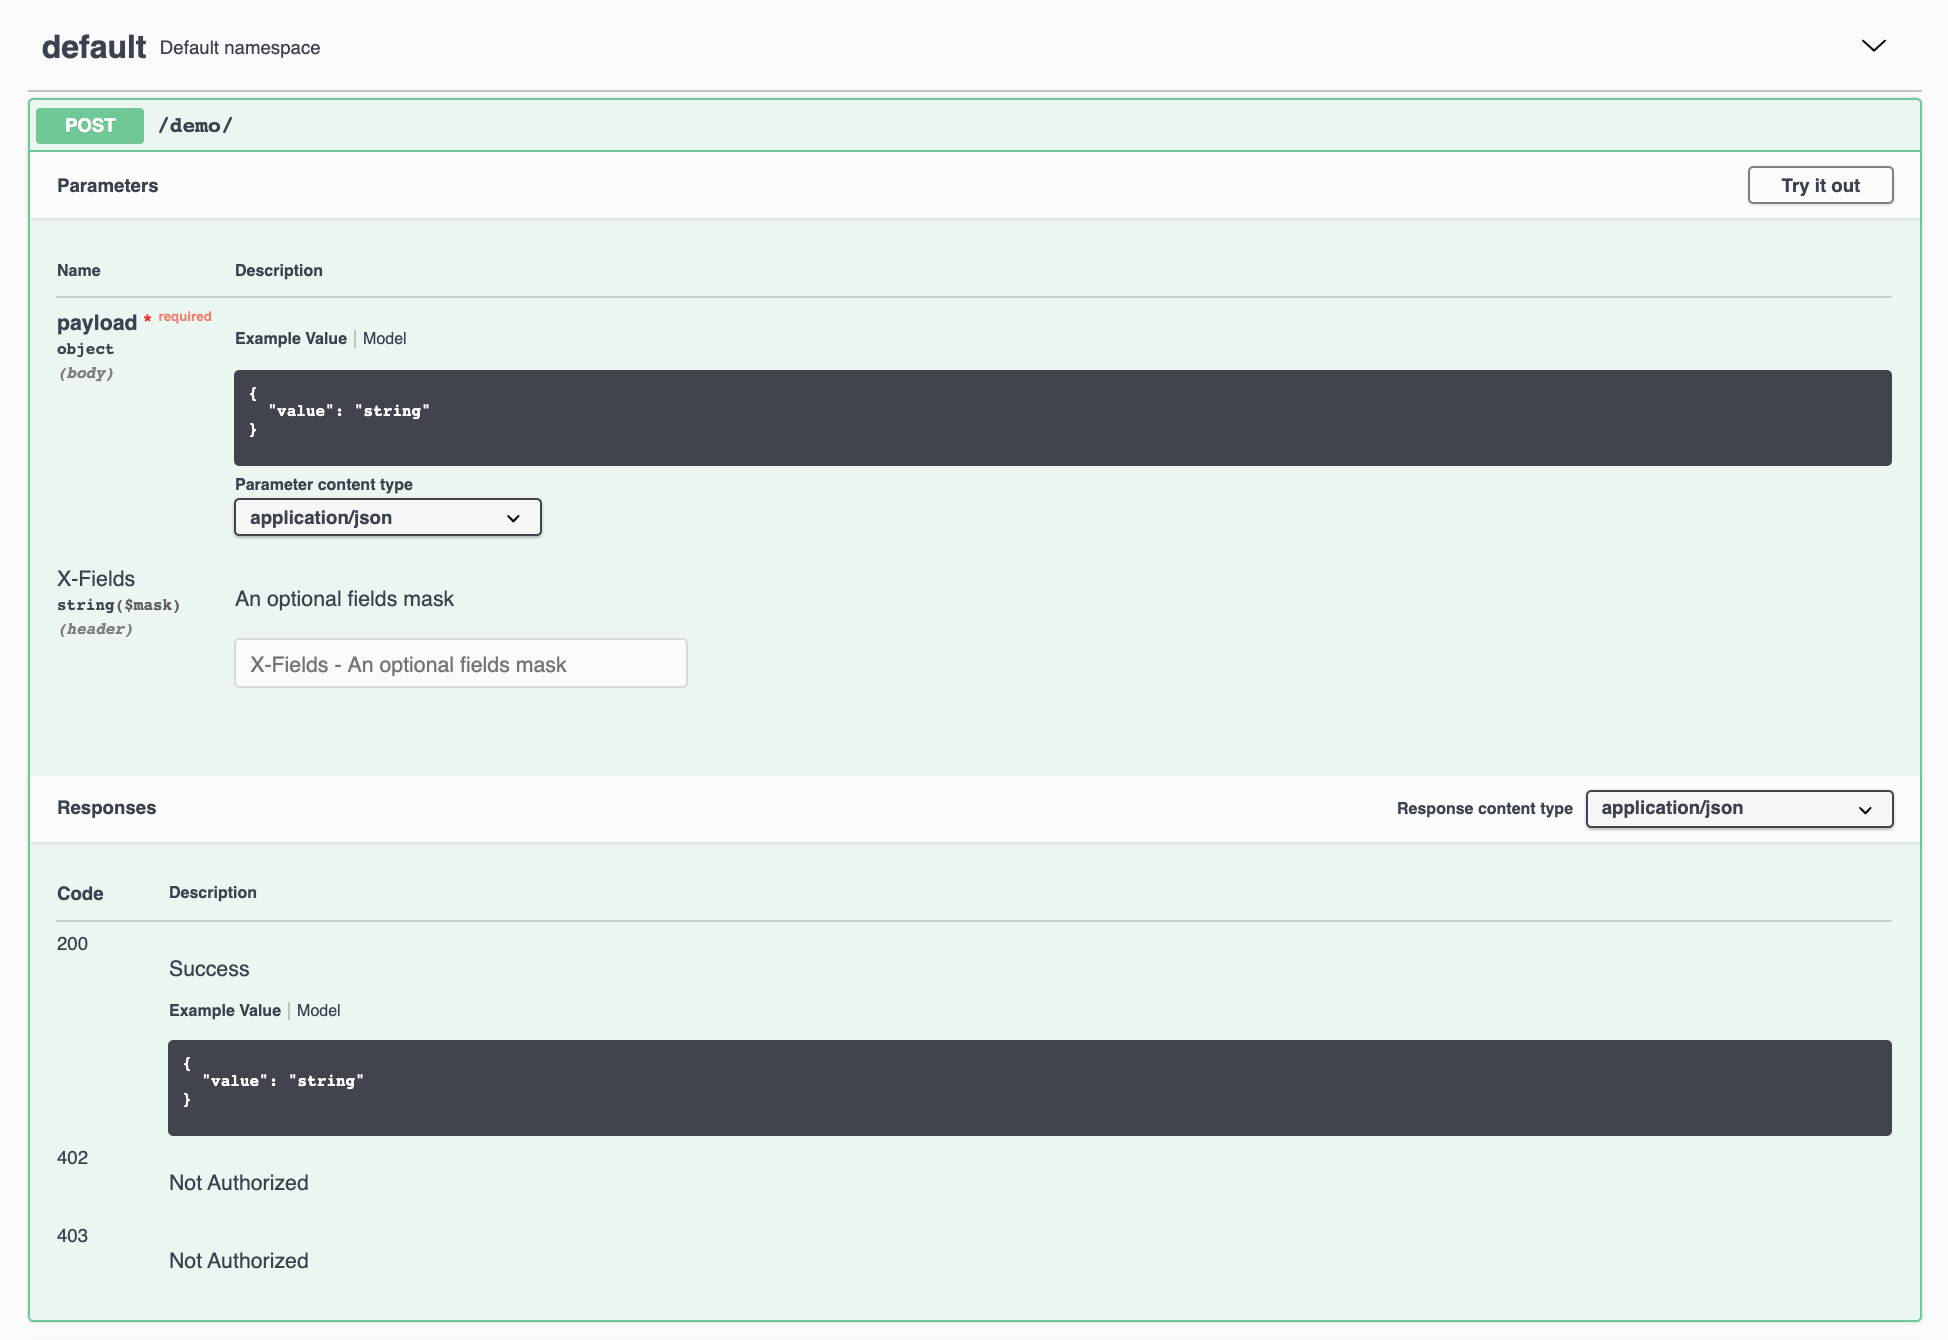
This will start the server at port 5003. You can access the Swagger UI on http://localhost:5003/docs


Try out by posting some values to the Endpoint.
To get Yaml documentation, click Try out from Swagger UI doc or hit http://localhost:5003/swagger, this will generate a yamldoc.yml file.

basePath: /
consumes:
- application/json
definitions:
  Resource:
    properties:
      value:
        description: example text
        maxLength: 200
        minLength: 1
        type: string
    required:
    - value
    type: object
info:
  description: TEST APP API
  title: TEST APP API
  version: 1.0.0
paths:
  /demo/:
    post:
      operationId: post_demo_list
      parameters:
      - in: body
        name: payload
        required: true
        schema:
          $ref: '#/definitions/Resource'
      - description: An optional fields mask
        format: mask
        in: header
        name: X-Fields
        type: string
      responses:
        '200':
          description: Success
          schema:
            $ref: '#/definitions/Resource'
        '402':
          description: Not Authorized
        '403':
          description: Not Authorized
      tags:
      - default
  /swagger:
    get:
      operationId: get_hello_swagger
      responses:
        '200':
          description: Success
      tags:
      - default
produces:
- application/json
responses:
  MaskError:
    description: When any error occurs on mask
  ParseError:
    description: When a mask can't be parsed
swagger: '2.0'
tags:
- description: Default namespace
  name: default
Share your thoughts via twitter @aravind_kumar_g ¯\_(ツ)_/¯